
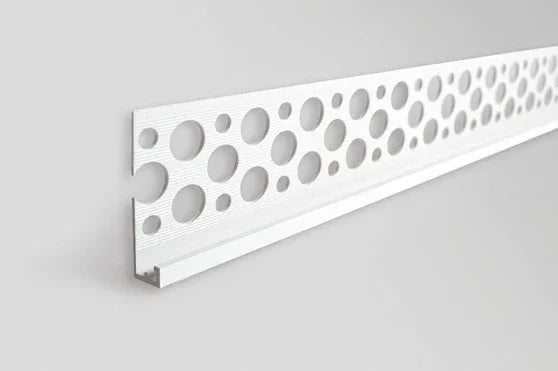
6mm PVC RENDER STOP BEAD 2.5m


Price:
Sale price£2.60

Shipping calculated at checkout

Stock:
In stock

Pickup available at Renders World Southampton

Usually ready in 2 hours

Description

The 6 mm PVC render stop bead without mesh is the no-wing member of the stop bead family, matched to a standard 6 mm thin-coat depth but fixed mechanically for terminations against dry substrates — retrofit edges, partial elevations, and junctions with existing finishes where no wet basecoat sits behind the bead.

Where the 6 mm No-Mesh Stop Bead Performs Best — UK Dry-Junction Terminations

The 6 mm PVC render stop bead without mesh is a 2.5 m white rigid PVC profile that forms a flush 6 mm termination edge wherever thin-coat render meets a dry substrate, an existing finish, or a prior installation lacking the continuous wet basecoat needed to embed a mesh wing. It belongs to the render stop beads range, and its nose dimension is identical to the mesh-backed 6 mm sibling.

What separates the two profiles is fixing logic, not depth: this bead anchors through a perforated flange mechanically, rather than bonding chemically through embedded mesh. Specify it on retrofit terminations, partial-elevation work stopping against painted or pre-rendered surfaces, and boundaries between new render and existing trim or cladding — so the correct detail follows what sits behind the bead, not the finish in front of it.

Why Trade Specifiers Choose the No-Mesh Stop Bead for Retrofit Work

  • Correct detail at dry junctions: the absence of a mesh wing makes this the technically right profile against existing finishes, where a wing pressed onto a dry surface has nothing to bond into and sits as an unreinforced frill behind the topcoat.
  • Standard 6 mm flush depth: matches a 3–5 mm reinforced basecoat plus 1.5–2 mm topcoat, holding the nose level so transitions to mesh-backed beads elsewhere on the elevation stay seamless.
  • Leaner run for long retrofits: carrying less material per metre than the mesh-wing version keeps extensive partial-elevation terminations economical across every linear metre.
  • Non-corrosive PVC body: no rust telegraphing through light silicone or acrylic topcoats in damp or coastal UK exposure, and no oxide staining at the nose line.
  • Clean site cutting: tin snips give square butt cuts and a fine-tooth hacksaw produces accurate 45° mitres — no abrasive-disc dust on occupied refurbishment sites.

Technical Specifications — 6 mm No-Mesh Stop Bead Data Highlights

Property Value
Profile type Render stop bead, no mesh wing
Body material Rigid PVC, white, UV-stabilised
Render depth (nose) 6 mm
Length 2.5 m per piece
Fixing method Mechanical — adhesive dabs, render staples, or substrate-appropriate fasteners
Fixing centres 200–250 mm along perforated flange
Target render build-up 3–5 mm basecoat + 1.5–2 mm topcoat
Frame gap (sealant joint) 2–3 mm
System mesh lap onto flange 100 mm minimum for continuous reinforcement
Application temperature +5 °C to +25 °C (governed by render or adhesive)
Compliance reference Typically meets BS EN 13658-2 design principles for plastering accessories — confirm against project documentation

How to Install the 6 mm No-Mesh Stop Bead — Fixing, Alignment, Over-Rendering

Dry-fit the bead against the termination line and check the nose for line and level with a long straight edge before committing any fixing. Mark fixing points along the perforated flange at roughly 200–250 mm centres, then anchor with render staples into masonry, screws into timber or board, or intermittent adhesive dabs on suitable surfaces. Keep adhesive dabs intermittent — a continuous bead squeezes out behind the nose during pressing and disturbs alignment.

Over-render the perforated flange so it is fully concealed within the wider basecoat field, leaving only the 6 mm nose proud at the finished surface. For the complete step-by-step method — dry-fitting tolerances, fixing centres by substrate, reveal-corner mitres, and sealant sequencing — the stop bead installation guide for UK projects sets out each stage in order, so the on-site sequence stays right first time.

Installation Notes — Sealant Joints and Junctions With Mesh-Backed Beads

Where the bead terminates against a window or door frame, leave a 2–3 mm gap between the nose and the frame face. Once the render has fully cured, this gap takes a low-modulus UV-stable sealant that forms the primary waterproof joint and absorbs differential movement between the render and the frame. Filling it with render instead of sealant is the most common cause of edge cracking at frames, on retrofit work just as much as full elevations.

Where this profile meets an adjacent run of mesh-backed bead — typically where a partial retrofit transitions into a full-elevation area — butt the noses tightly end to end and lap the system fibreglass reinforcement mesh from the wider facade onto the perforated flange by a minimum of 100 mm. That overlap preserves continuous crack control across the change in fixing method, so the transition performs like a single reinforced field.

Pro Tips From UK Installers Using the No-Mesh Stop Bead

For the best result, treat the mesh-versus-no-mesh choice as a question about what sits behind the bead. Reaching for mesh-backed beads on every job is a common reflex, yet a wing pressed against a dry painted finish has nothing to key into and adds bulk without strength.

  • Pre-mark fixing centres at the bench: marking the 200–250 mm points on the ground takes seconds and saves stapling into the wrong substrate position once the bead is held against an awkward sill underside.
  • Test-fix one staple on old masonry: retrofit brick hardness is unpredictable, so prove a single fixing before the full run — a softer brick may need a longer staple or a switch to screwing through the perforations.
  • Recoat the flange before topcoat: feathering basecoat too thin over the flange lets the perforation pattern read through a translucent finish, so build the flange zone fully before the topcoat pass.
  • Keep the nose 5 mm clear of adjacent rigid profiles: where a stop bead meets a bellcast, finish just above and seal the gap, since two profiles bearing together crack the render at the junction.

How the 6 mm No-Mesh Bead Compares to Sibling Stop Beads

Depth is matched to the render finish; the mesh-versus-no-mesh selection is matched to the substrate condition behind it. The nearest choices for the same termination decision are set out below.

Variant Key Spec When to Choose
6 mm PVC stop bead with mesh 6 mm · mesh wing New EWI with continuous wet basecoat
6 mm PVC stop bead no mesh 6 mm · mechanical fix Retrofit and dry-junction terminations
10 mm PVC stop bead no mesh 10 mm · no mesh Monocouche and deeper EWI build-ups

Is the 6 mm No-Mesh Stop Bead Right for Your Project?

  • Best fit: terminations against existing finishes, retrofit and partial-elevation work, or any junction without a continuous wet basecoat behind the bead.
  • Switch to mesh-backed at the same depth: for new full-elevation render with continuous wet basecoat, the 6 mm PVC stop bead with mesh reinforces the termination chemically.
  • Step up for deeper systems: monocouche and thicker EWI build-ups pair with the 10 mm no-mesh stop bead, with the wider render stop beads range covering 3 mm to 15 mm across both families.
  • Need quantity advice? retrofit terminations often run longer than openings suggest because elevations stop at material changes, and the Renders World technical desk can confirm exact lengths against site drawings on request.

FAQ — No-Mesh Stop Bead Fixing, Compatibility, Ordering

When should I choose the no-mesh version over the mesh-backed bead?
Choose no-mesh whenever the bead lands against a dry condition — existing finish, prior render, painted substrate, or any junction with no fresh wet basecoat to embed a mesh wing into. Choose mesh-backed when the bead sits within a continuous wet basecoat, the standard scenario on new-build and full-elevation work. The 6 mm depth is matched to the render finish; the mesh selection is matched to the substrate behind it.

How is the no-mesh bead fixed in place?
Mechanically — typically with adhesive dabs along the perforated flange, render staples into masonry or insulation, or appropriate fasteners into timber or board. Spacing of around 200–250 mm holds the profile securely on most facades, and the flange is then over-rendered so only the 6 mm nose stays visible at the finished surface.

Will the flange show through coloured silicone topcoats?
The 6 mm nose is fully masked by a correctly applied 1.5–2 mm topcoat at the manufacturer's coverage rate. The visibility risk here is the perforated flange behind the nose: where basecoat is feathered too thin over it, the perforation pattern can read faintly through a translucent topcoat. Recoating the flange zone before topcoat, or sealing with a matching silicone masonry paint after cure, resolves this cleanly.

Can I still maintain continuous mesh reinforcement at this termination?
Yes. Lap the system reinforcement mesh from the wider facade onto the perforated flange by a minimum of 100 mm. The perforations key the lapped mesh into the basecoat above, giving a continuous reinforced field across the termination — the same crack control as a mesh-backed bead, achieved by overlapping system mesh instead of relying on a factory-bonded wing.

Is there a temperature limit for installation?
The PVC profile is unaffected by cold, but the fixing adhesive or basecoat is. Install only when the chosen render or adhesive is within its window — typically +5 °C and rising, with no rain forecast within 24 hours. Mechanical staples and screws are not temperature-limited, so the bead can be dry-fixed first and over-rendered once conditions allow.

How many no-mesh stop beads does a typical retrofit elevation need?
Retrofit lengths vary more than new-build because terminations follow material boundaries rather than fitted openings. Measure every edge where new render stops against an existing surface, divide by 2.5 m, and round up with a 10–15% waste allowance. A partial-elevation retrofit typically uses 15–25 linear metres, with the exact figure driven by how the works are scoped.

You may also like

Recently viewed