External wall insulation adds 50 mm to 200 mm of new build-up to the original wall, which means every existing window sill on the elevation now sits too far back to throw rainwater clear of the finished render. A powder-coated aluminium oversill from the window sill extensions range at Renders World restores that drainage overhang, protects the insulation layer from water tracking, and gives the window-to-wall junction a clean factory-finished line that lasts the working life of the render system. This guide explains how to choose the correct oversill depth and fit it properly — from measuring and selecting the right profile to cutting, sealing, and integrating with the basecoat.
Window sill detailing is one element of a wider opening-treatment discipline that includes reveal returns, corner beads, and stop beads — the render detailing around windows and doors guide is the companion pillar that walks through the full junction sequence around each opening. Get the oversill right, and every other detail above and beside it falls into place more easily.
Why Oversills Are Critical on EWI Facades
Aluminium oversills extend the original window sill outward by 110 mm to 220 mm, restoring the drip projection that an EWI build-up otherwise eliminates — installers consistently report that sill detailing is the single most common source of warranty call-backs on UK render projects. An existing sill adequate on an uninsulated wall becomes effectively useless the moment insulation boards are bonded to the facade. Without a proper oversill, rainwater running off the glass and frame hits the shortened sill nose, tracks inward across the surface, and runs down the face of the new render — or worse, behind it. On a typical UK semi-detached house with 100 mm graphite EPS and a 10 mm render build-up, wall thickness increases by approximately 110 mm, meaning a 40 mm original sill projection now sits recessed behind the finished facade.
- Water staining within the first season: rainwater that cannot drip clear of the facade runs repeatedly down the render surface below the sill, depositing mineral residue and atmospheric grime in visible vertical streaks that darken progressively with each wetting cycle.
- Algae colonisation within two years: the persistently damp zone beneath an under-projecting sill provides ideal conditions for green algae and, on north-facing elevations, red algae growth — biological staining that requires specialist cleaning and recurs unless the moisture source is eliminated.
- Thermal performance loss over time: water tracking behind the render and into the insulation layer raises the in-situ moisture content of the boards, increasing their effective thermal conductivity and reducing the U-value performance the EWI system was installed to deliver.
Industry best-practice guidance specifies that every sill on an insulated facade should project a minimum of 30–40 mm beyond the finished render surface and incorporate a drip return on the underside to break the capillary path. Aluminium oversills achieve both requirements with a factory-formed drip edge on the front and a depth range that accommodates insulation thicknesses from 50 mm to 200 mm. When correctly specified and installed, this single low-cost component permanently protects the window-to-wall junction from water ingress and removes the most common cause of EWI warranty claims in the UK.
Measuring and Selecting the Correct Oversill Depth
Choosing the right oversill depth comes down to a single calculation that anyone can do at the kitchen table before ordering: take the insulation thickness, add roughly 10 mm for the render system, then add a further 30–40 mm so the finished sill projects past the rendered face — the table below shows how that calculation lands across the most common UK build-ups. Getting this measurement right is the single most important decision in the entire sill-extension process, because an undersized oversill that finishes flush with or behind the render plane provides no weather protection at all, while a grossly oversized profile looks disproportionate and attracts mechanical damage from ladders and scaffolding.
| Insulation Thickness | Render Build-Up | Min. Overhang | Total Depth Required | Recommended Oversill |
|---|---|---|---|---|
| 50 mm | 10 mm | 30–40 mm | 90–100 mm | 110 mm |
| 80 mm | 10 mm | 30–40 mm | 120–130 mm | 140 mm |
| 100 mm | 10 mm | 30–40 mm | 140–150 mm | 170 mm |
| 150 mm | 10 mm | 30–40 mm | 190–200 mm | 220 mm |
| 200 mm | 12 mm | 30–40 mm | 242–252 mm | 220 mm + packing |
For the vast majority of UK domestic retrofits using 80–100 mm graphite EPS, the 140 mm or 170 mm oversill covers the calculation comfortably with a safe 35–40 mm drip projection. On projects specifying thicker insulation for Part L compliance — particularly new builds targeting the Future Homes Standard wall U-value, subject to current building regulation guidance — the 220 mm profile is the standard choice. Measure each window opening individually rather than assuming all sills are identical; on pre-war properties, original sill projections vary by as much as 20 mm between openings on the same elevation, and that variation transfers directly into the oversill depth calculation.
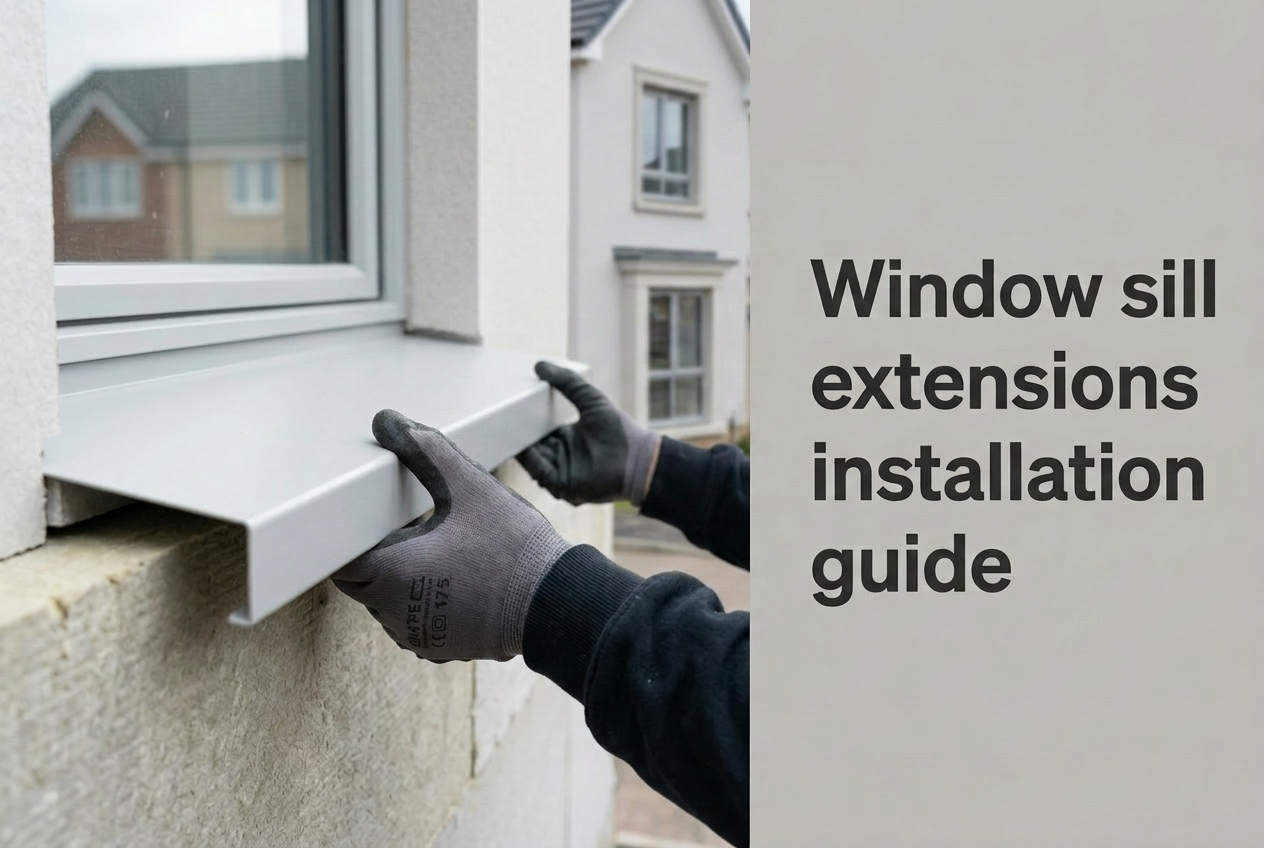
Step-by-Step Installation Method for Aluminium Oversills
Oversills should be fitted after the insulation boards have been bonded and mechanically fixed, but before the basecoat and mesh reinforcement layer goes on — the sequence below is the working method that delivers a watertight detail first time, and it is worth sharing with your installer if they have not fitted oversills before. This sequencing allows the oversill's rear upstand to be sealed against the window frame or existing sill while the front edge sits proud of the insulation face, ready to project beyond the render once the topcoat is applied. Working to this order also means the basecoat layer can be dressed up to the oversill's rear flange, creating a continuous weatherproof junction without relying solely on sealant for long-term water exclusion.
- Measure and mark the cutting length. Measure the full width of the window opening at sill level plus the depth of both reveal returns. The oversill must extend into the reveal on each side by a minimum of 10 mm to prevent water tracking around the end of the profile. On a standard 1,200 mm window opening with 110 mm reveals each side, the total cut length is 1,200 + 110 + 110 = 1,420 mm. Mark the cut line with a fine permanent marker on the protective PVC film.
- Cut to length. Use a fine-tooth metal-cutting blade in a mitre saw or an angle grinder with an aluminium cutting disc. Powder-coated aluminium produces clean cuts with minimal burring; file any sharp edges with a fine flat file to prevent injury and improve the sealant bond at the end-cap junction.
- Dry-fit and check the fall. Position the oversill on the existing sill or insulation face with a slight forward fall of approximately 5–10 degrees away from the window. Check with a spirit level that the front drip edge sits lower than the rear upstand — water must never pool on the oversill or run back toward the frame. Shim the rear edge with small PVC packers if the existing sill does not provide adequate fall.
- Apply sealant to the rear upstand. Run a continuous bead of low-modulus, UV-stable silicone sealant along the top of the rear upstand where it meets the underside of the window frame or existing sill. This sealant line is the primary weather seal at the frame-to-sill junction and must be continuous with no gaps. A pre-compressed hydrophobic foam tape applied behind the rear upstand before the sealant provides a secondary seal that accommodates thermal movement.
- Fix the oversill in position. Apply a continuous bead of low-expansion PU foam or weatherproof silicone adhesive across the underside of the oversill where it contacts the existing sill or insulation surface. Press firmly into position and hold or clamp until the adhesive achieves initial grab — typically 15–30 minutes. Avoid mechanical fixings through the top surface of the oversill, as screw holes create water entry points that are difficult to seal permanently. If mechanical fixing is essential on exposed or high-wind elevations, use stainless steel screws with EPDM washers through the rear upstand only, where the frame overhang protects the fixing from direct rain.
- Fit verge trim upstands at the reveal junctions. A verge trim upstand fits vertically at each end of the oversill where the sill meets the insulated reveal. This upstand prevents water from tracking sideways off the sill edge and behind the insulation at the reveal junction. Cut the verge trim to the height of the reveal, seal it to the oversill end with silicone sealant, and dress the basecoat reinforcement layer over the verge trim's mesh flange to tie the detail into the main render system.
- Clip on the end caps. Pair the oversill with colour-matched end caps at each exposed end. The end cap slides over the cut edge and is sealed with a thin bead of silicone to prevent moisture wicking into the aluminium profile's internal cavity. Ensure the end cap sits flush with the front drip edge for a clean visual line.
- Leave the protective PVC film in place. Always leave the factory-applied PVC film attached during the basecoat and topcoat application stages. The film protects the pristine powder-coated surface from mortar splashes, trowel scrapes, and scaffold abrasion. Remove it only after the final render coat has cured and the scaffold is coming down — peeling the film earlier exposes the aluminium to site damage that cannot be repaired without replacement.
After the basecoat and mesh layer has been applied up to the rear flange of the oversill and the silicone render topcoat has been finished, inspect the junction from below. The underside of the front drip edge must be clean, with no render or sealant bridging the drip return. If any material has crept past the drip line during rendering, scrape it away before the render fully cures — the discipline here is identical to the drip-lip check required on bellcast beads and is equally critical to long-term water performance.
Trade Tips for Avoiding the Most Common Oversill Failures
The single most frequent oversill failure on UK EWI sites — and the biggest cause of expensive call-backs — is not a material defect; the comparison between a good installation and a leaking one usually comes down to two or three habits the trade is consistent about. Water tracks around the ends of the profile and into the insulation layer at the reveal junction when the oversill is cut to the exact window width without extending into the reveals, or when the verge trim upstand is omitted to save time. The water path is invisible once the render is complete, and the first sign of failure is typically damp staining or mould growth inside the window reveal — a problem that requires partial system removal to diagnose and repair. Extending the oversill into both reveals by a minimum of 10 mm and fitting verge trims at every reveal junction eliminates this failure mode entirely.
Key Takeaway: always extend the aluminium oversill into both window reveals by at least 10 mm and fit a sealed verge trim upstand at each end — this 60-second step per window prevents the most common and most expensive oversill failure on UK EWI facades, which is water tracking around the profile ends and into the insulation layer behind the render.
- Match the colour to the window frame, not the render: white oversills pair with white uPVC frames; anthracite oversills pair with grey aluminium or anthracite uPVC frames. Mismatched colours between sill and frame create a visual break that draws attention to the detail rather than allowing it to recede into the facade composition.
- Do not seal the front drip edge to the render surface: a common but incorrect practice is to run a bead of sealant along the underside of the oversill where it overhangs the render face. Many installers assume this neatens the detail, but the sealant bridges the drip return and channels water back onto the facade — the exact problem the oversill was installed to prevent. The front edge must remain free-draining with a visible air gap between the underside of the drip return and the rendered surface below.
- Order end caps and verge trims at the same time as oversills: end caps and verge trims are sold separately, and running out mid-installation leads either to unfinished details left overnight (allowing rain to enter the system) or to an emergency order that delays the programme. Count every window opening on the elevation plan, add two end caps and two verge trim lengths per opening, and include the total in the initial Renders World order.
Sizing Guide for Common UK Project Types
UK domestic properties fall into a relatively small number of insulation-thickness categories, and matching the oversill depth to each category is straightforward once the wall construction and target U-value are known — the table below maps the most common UK project types to the recommended profile, accounting for the render build-up and a safe 35 mm minimum drip projection in each case. Use it as a quick reference during specification, then confirm by measuring each opening on site before ordering.
| Project Type | Typical Insulation | Recommended Oversill | Colour Option |
|---|---|---|---|
| Victorian solid-wall retrofit | 80–100 mm graphite EPS | 140 mm or 170 mm | White or Anthracite |
| 1930s semi-detached cavity wall | 50–80 mm graphite EPS | 110 mm or 140 mm | White or Anthracite |
| Post-war concrete panel | 100–150 mm graphite EPS | 170 mm or 220 mm | White or Anthracite |
| New-build Part L compliance | 150–200 mm graphite EPS | 220 mm | Anthracite (most specified) |
| Timber-frame new-build | 50–80 mm mineral wool | 110 mm or 140 mm | Anthracite (most specified) |
On larger commercial and multi-occupancy projects, oversill quantities rise quickly. A four-storey residential block with 48 window openings requires 96 end caps, 96 verge trim lengths, and enough oversill length to cover the combined linear run of all sills — typically 55–70 linear metres depending on window widths. Ordering through a single supplier avoids colour-batch variation between deliveries and ensures the powder-coat finish matches across every elevation.
Written by Mariusz Saja. Technically reviewed by Renders World Team. Last reviewed Jun 2026.
FAQ — Oversill Measuring, Fitting, Compatibility
How much do aluminium oversills cost per window, and what else do I need to order?
A single 2.5 m aluminium oversill typically costs between £12 and £18 depending on the depth, and most standard UK window openings (900–1,200 mm wide) can be cut from one length with material left for a second smaller opening. Each window also needs a pair of colour-matched end caps and two verge trim upstand lengths cut to the reveal height. For a typical three-bedroom semi-detached house with six to eight window openings, the total oversill material cost — including end caps and verge trims — usually sits between £120 and £200, a small fraction of the overall EWI system cost for protection at every window-to-wall junction.
Can I fit oversills myself, or should I ask my installer to do it?
On an EWI project, oversills should normally be fitted by the installer carrying out the insulation and render system, so the sill, reveal trims, basecoat, and sealant all work as one weatherproof detail. The correct sequencing — insulation first, then oversills, then basecoat and mesh, then topcoat — means the sill installation is embedded within the wider system build-up. While a competent DIYer might fit an oversill on a standard uninsulated brick wall, leaving EWI oversill installation to a professional rendering team ensures the window junctions are fully weatherproofed and the system warranty remains intact.
What fall angle should the oversill have, and how do I achieve it on a level existing sill?
The oversill should fall forward at approximately 5–10 degrees away from the window frame so rainwater drains toward the front drip edge rather than pooling on the surface or running back toward the frame. If the existing sill is level or slopes slightly backward (common on older properties where settlement has occurred), place thin PVC packers beneath the rear upstand of the oversill before applying the adhesive bed. Check the fall with a spirit level across the profile width and adjust the packer thickness until the forward slope reads between 5 and 10 degrees consistently across the full length.
Do oversills need to be painted, or are they supplied pre-finished?
All oversills in the Renders World range are factory powder-coated in either brilliant white or anthracite grey and supplied with a protective PVC film that remains in place throughout the rendering process. The powder-coat finish is UV-stable and maintenance-free for the expected service life of the EWI system. Painting is not required and is not recommended, because site-applied coatings are less durable than factory powder-coating and may peel or discolour within a few years of UV exposure.
What should I do if my measurement falls between two oversill sizes?
If the calculation sits between standard depths, choose the next size up rather than the smaller profile. An oversill that projects slightly further than the minimum 30–40 mm is far less risky than one that finishes too close to the render face, because the key requirement is maintaining a clear drip projection beyond the finished facade. On very thick systems where the 220 mm profile is still marginally short, the larger profile can be packed and aligned correctly during installation using PVC shims beneath the rear upstand to achieve the required forward fall.
How do verge trim upstands differ from the oversills themselves?
The two profiles share the same powder-coated aluminium construction but address different junctions. An oversill fits horizontally over the window sill with a downward-angled drip edge that sheds water clear of the wall below. A verge trim upstand fits vertically at each reveal end of the oversill (and at top-edge terminations where insulation meets a fascia or parapet), with an upward return that closes the side junction and prevents water tracking around the profile end. Both are needed at every opening for a complete weatherproof detail.
Summary and Next Steps
An aluminium oversill extends the existing window sill so rainwater drips clear of the new rendered wall instead of running back onto it — on any EWI project this is not an optional finishing piece but a critical weathering detail that prevents staining, damp patches, and hidden moisture behind the render. The installation sequence is consistent across UK project types: bond and fix the insulation boards first, fit the oversill with a continuous sealant line at the rear upstand, dress the basecoat and mesh up to the flange, and finish by fitting verge trim upstands and end caps at every reveal junction. Correct depth selection — 110 mm for thinner systems up to 220 mm for Part L compliance builds — ensures a minimum 30–40 mm drip projection that sheds water cleanly for the full lifetime of the render. Before ordering, measure each opening, confirm the insulation thickness, then specify the oversill depth plus two end caps and two verge trim upstands per window through the Renders World window sill extensions collection so the complete sill detail for every opening arrives in a single delivery from our Southampton warehouse.