

Description
For internal skim plaster, drylining corners, and thin acrylic finishes at 2–3 mm coat depth, a deeper render nose stands proud of the skim and reads as a ridge — this is the completion profile at the thin end of the range, covering internal plaster corners, damp-room detailing, and the interior face of EWI window reveals.
Where the L250 White Plastering Corner Performs Best on UK Internal Work
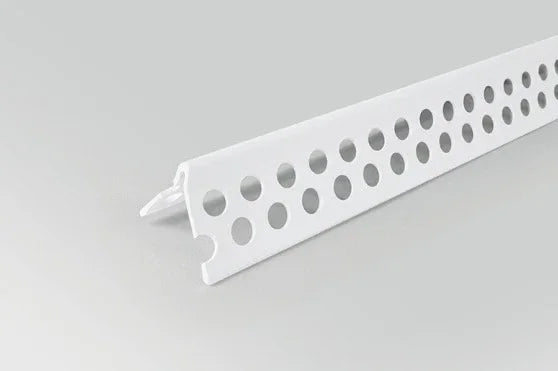
The PVC L250 plastering corner white is a rigid uPVC straight angle profile with a 3.3 mm arris and 23 mm perforated wings, the thinnest rigid straight corner in the render corner beads range, sized for internal plaster and skim work at 2–3 mm coat depth. The narrow wings sit inside the skim, the perforations key mechanically into the plaster, and the arris finishes flush with the surface to give a defined corner line that holds through thermal cycling and minor knocks.
The "L250" designation is the manufacturer length code for the 2,500 mm cut length common across the rigid PVC range, and the profile itself is the thin-coat class: exterior-grade UV-stable uPVC suitable internally and externally wherever the coat sits in the 2–3 mm band. That dual capability of plasterboard skim inside and thin acrylic render outside is what makes it the completion profile for EWI window reveals, where the external render transitions to internal plaster on the reveal face and the corner depth must match the skim on the inside of the opening.
Why UK Plasterers Choose the L250 Skim-Coat Profile
- Sized for 2–3 mm skim and thin-coat finishes: the thinnest rigid profile in the range, finishing flush at skim-coat depth where a deeper-nose render bead would stand proud and read as a ridge.
- Discreet 3.3 mm arris with 23 mm wings: sits cleanly inside the plaster coat, giving a defined straight edge with no visible step between the arris and the surrounding finish.
- Corrosion-immune in damp rooms: the alkali-resistant, lead-free uPVC performs in kitchens, bathrooms, wet rooms, and pool enclosures without staining or rust bleed, eliminating the corrosion telegraphing that galvanised metal beads produce over time.
- EWI reveal completion profile: matches the internal plasterboard skim depth on the reveal face where an EWI installation transitions from external render to internal plaster at the opening, covering the reveal interior cleanly with one profile.
- Mechanical key through perforated wings: plaster keys through the wing perforations during the skim pass, locking the bead into the coat without a separate mesh layer.
Technical Specifications — L250 Plastering Corner Data
| Property | Value |
|---|---|
| Length | 2,500 mm (L250 designation) |
| Arris width | 3.3 mm |
| Wing width | 23 mm per wing |
| Internal angle | 90° |
| Suitable coat depth | 2–3 mm plaster or thin render |
| Material | Exterior-grade rigid uPVC · alkali-resistant · lead-free · UV-stabilised |
| Profile type | Rigid straight (curved geometry: see arched variant) |
| Mesh | None — wings key mechanically into plaster or render coat |
| Colour | White |
| Fire classification | Class 1Y, self-extinguishing on removal of flame (BS 476, subject to system confirmation) |
| Standard reference | BS EN 13914-1&2:2016, subject to system confirmation |
| Application temperature | +5 °C to +30 °C, air and substrate |
| Pack size | Single 2.5 m length; trade packs available |
Specification data is drawn from industry technical references for 2 mm uPVC plastering and skim corner bead profiles. Confirm against the current manufacturer's datasheet for warranty-critical or specification-governed applications.
How to Apply the L250 Corner — Embedding Into the Skim Pass
Apply a thin continuous bed of finish plaster or adhesive mortar to each wing face before offering the profile up. Press the arris square to the substrate so plaster squeezes through every perforation along both wings, keying the profile mechanically into the coat, and check verticality with a spirit level since the rigid uPVC holds whatever line it is given at fixing. On plasterboard the usual method is embedding the bead directly in the first skim pass: offer it up, press it into the wet skim, level it, then complete the coat to the finished surface in the same pass.
Where additional security is needed on high-suction substrates, damp locations, or higher-traffic corners, pin through the perforations with non-corrosive fixings at 300–400 mm centres before the skim pass. Trim ends with tin snips or a fine-tooth saw, butt cut ends tightly at joints, and skim continuously across the join so the finished line reads as a single edge. For the full sequence covering reveal, head, and base terminations, see the corner bead installation step-by-step guide.
Installation Notes — Skim Cure Discipline and Moisture-Room Detailing
For the best result, work within the +5 °C to +30 °C window and bed the bead and complete the skim coat in the same session so the plaster around the wings and the wider skim cure as one mass. On thin coats the cure is fast and the working margin short, so interrupting the pass after bedding lets the bead-side plaster start drawing in while the surrounding wall stays wet, and the differential pull can leave a hairline at the wing line that shows through finish decoration.
In moisture-prone rooms the uPVC bead is the right material specification, and the substrate detail matters alongside it: use moisture-resistant board behind the corner zone in bathrooms and wet rooms, and confirm the skim is rated for damp conditions before fixing. On EWI reveal details where the internal corner carries this profile and the external corner carries a render-spec bead, the render detailing around windows and doors guide covers matching corner geometry across both faces of the opening.
Pro Tips From UK Plasterers Working Skim-Coat Corners
The most common error with thin skim profiles is pinning too infrequently on plasterboard and trusting the green skim alone to hold the bead. A 2 mm uPVC wing has very little bearing surface compared with a 40 mm render bead wing, so on a freshly skimmed face the bead can shift fractionally before the plaster grabs, and even a 1 mm displacement at the arris shows under raking light. Across skim-corner specifications supplied by Renders World, the fix is consistent: either pin at 300 mm centres before skimming, or hold the bead pressed firmly for the first 30–60 seconds while the skim begins to grip; once the first pass sets, the second coat locks the geometry permanently.
- Hold or pin during the green phase: the first thirty seconds after embedding decide whether the arris stays true or drifts a millimetre, and holding pressure or pre-pinning both solve it.
- Match bead bedding to the skim mix: bedding in one batch and skimming over with another mixed an hour later can leave a faint shadow line at the wing edge, so same-batch bedding-and-skim keeps colour and shrinkage uniform.
- Cut clean for tight joints: tin snips work, but a fine-tooth hacksaw gives a perpendicular cut that butt-joins tighter and disappears under the skim more reliably on long runs.
- Specify uPVC in damp rooms by default: galvanised beads in bathrooms and pool enclosures can show rust bleed at the arris within two to three years, so the marginal cost of uPVC is small against the callback cost of redecorating corners.
How the L250 uPVC Corner Compares to the Aluminium Plaster Corner
Both profiles form the internal plaster corner at skim depth, so the decision comes down to material behaviour in the room rather than the corner detail. Read across to match the profile to the environment before ordering.
| Variant | Key Spec | When to Choose |
|---|---|---|
| PVC L250 plastering corner white | 3.3 mm arris · corrosion-immune · 2.5 m | Damp rooms, standard skim corners |
| Wet plaster aluminium 3m corner bead | Metal nose · dent-resistant · 3 m run | High-traffic internal plaster corners |
Is the L250 Plastering Corner Right for Your Project?
- Internal skim plaster corners on plasterboard, drylining, and thin acrylic finishes at 2–3 mm depth: the primary use case, where the 3.3 mm arris finishes flush at skim thickness and a deeper nose would read as a ridge.
- High-moisture environments (kitchens, bathrooms, wet rooms, pool enclosures): the corrosion-immune uPVC outperforms galvanised metal in permanently damp conditions, eliminating rust bleed at the arris through the life of the plaster.
- High-traffic internal plaster corners needing greater dent resistance: the wet plaster aluminium 3 m corner bead is the metal-spec equivalent at higher cost with a longer 3 m run.
- Curved or arched reveals at 2–3 mm skim depth: the PVC arched corner 2.5 m white is the flexible variant in the same depth class, conforming to curves down to 0.5 m radius.
- External render corners at 6 mm or deeper: step up to the 6 mm PVC corner bead no mesh for shallow render, or the corner PVC render bead with mesh for EWI thin-coat where the corner must tie into field reinforcement.
The L250 plastering corner is a UK-stocked profile held for next-working-day trade despatch at Renders World. Count one 2.5 m length per internal corner per storey plus 5–10% for cuts, and on EWI projects add the internal reveal corner count, typically four per window opening when both side reveals run to head and sill.
FAQ — L250 Plastering Corner Skim, Moisture, EWI
Is this profile suitable for standard 2 mm skim coat applications?
The profile is sized specifically for 2–3 mm coat depth, the standard range for finish skim plaster over plasterboard. At 2 mm the 3.3 mm arris finishes fractionally proud and at 3 mm it sits flush, which makes it the correct skim-coat corner where deeper-nose render beads would produce a ridge visible through the finished decoration under raking light.
Why use PVC over galvanised metal in a plastering application?
Galvanised metal beads corrode in persistently damp environments and rust bleed telegraphs through the plaster at the arris within a few years, whereas the uPVC formulation is chemically inert in contact with water, gypsum plasters, and standard cleaning products with no corrosion mechanism. For standard dry internal corners the difference is modest, but for kitchens, bathrooms, wet rooms, and pool enclosures the long-term finish quality difference is significant.
Can this profile be used on EWI window reveal details?
Yes, the thin-coat uPVC class suits external wall insulation at thin acrylic render depth and the internal plasterboard skim at reveal faces. At an EWI window reveal, this profile finishes the internal corner of the reveal at skim depth while the external face is detailed with a render-specific stop or corner profile at the render system's depth, giving both corners on the same opening matched coat depths with two profiles.
How many L250 beads do I need for a typical job?
Count one 2.5 m length per internal corner per storey plus 5–10% for cuts and joints. On EWI projects, add the internal reveal corners, typically four per window opening when both side reveals carry the profile to head and sill. On wet-room and bathroom jobs the corner density per square metre is usually higher than living spaces, so allow at the upper end of the wastage range.
Can this profile be bent to follow a curved reveal?
This is a rigid straight profile and cannot be curved without crimping the arris. For arched or curved reveals at the same 2–3 mm coat depth, use the PVC arched corner 2.5 m white, a flexible uPVC profile in the same depth class designed to conform to curves down to a 0.5 m minimum radius without notching, and tighter with the wing-scoring technique.
Is this profile suitable for external render applications?
The exterior-grade uPVC is UV-stable and weather-resistant, making the profile technically suitable for external thin acrylic render at 2–3 mm depth. For external EWI corners where the reinforcement must integrate with a fibreglass mesh layer, the mesh-wing corner bead is the stronger specification, so the L250 plastering corner is better suited to the internal face of EWI reveals and to internal plaster applications where no reinforcement layer is required.