
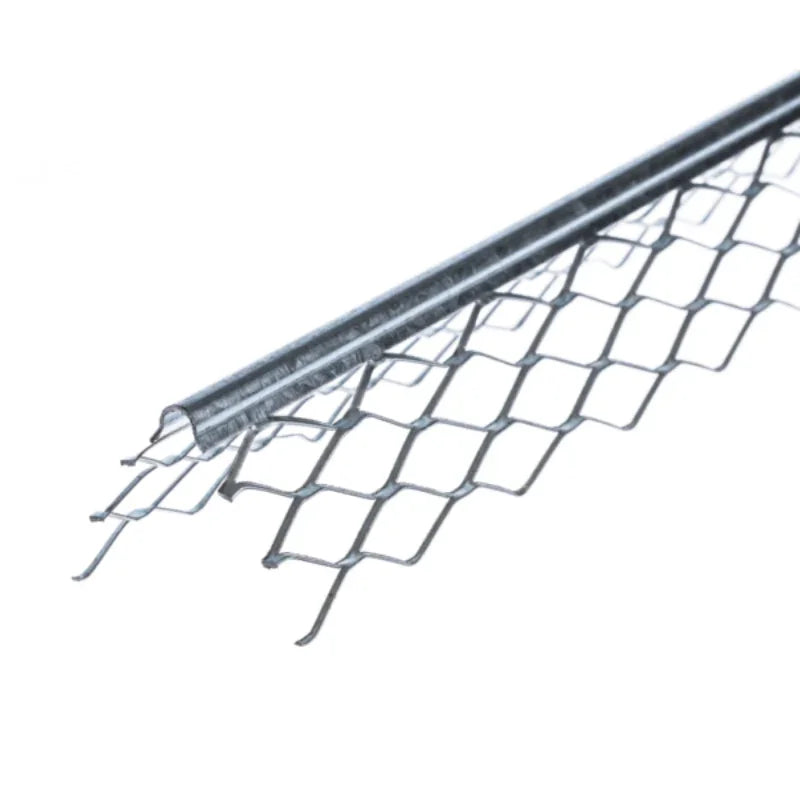

Description
Traditional multi-coat internal wet plaster needs a corner bead that survives the drying phase, not just the working day — the alkaline, moisture-saturated weeks after application are exactly when a galvanised steel bead begins to fail at the arris in a damp room.
What the Wet Plaster Aluminium Corner Bead Does in an Internal Plaster System
The wet plaster corner aluminium 3 m is an extruded aluminium angle bead dimensioned for internal multi-coat wet plaster at 12–19 mm total finished depth and classified A1 for reaction to fire, subject to the wider wall assembly's fire strategy. It is stocked within the render and plaster corner beads range and specified to eliminate the rust-bleed failure that affects galvanised steel beads in kitchens, bathrooms, and basements.
Metal wet plaster beads sit inside the plaster coats rather than on the surface: the perforated wings key mechanically into the undercoat, and the nose sets the finished depth at the corner while the skim is ruled off to it. At a full 3 m length the profile covers a UK storey-height corner in a single piece, removing the horizontal joint that is the hardest detail to keep invisible under raking light after decoration. The wide wing geometry gives a generous keying surface for thick undercoat and resists the shrinkage of heavy multi-coat plaster as it dries, so the arris line stays where it was set on the day of fixing.
What Makes the Wet Plaster Aluminium Bead Worth Specifying
- Aluminium construction for damp internal rooms: resists alkaline attack from freshly mixed wet plaster during the drying phase, eliminating the rust bleed at the arris that affects galvanised steel beads in kitchens, bathrooms, and basements.
- Full storey-height 3,000 mm length: removes the horizontal joint from a typical UK internal corner run, giving one continuous arris line from floor to ceiling.
- Sized for 12–19 mm wet plaster build-ups: nose and wing geometry matches browning-and-set, bonding-and-skim, and sand-and-cement undercoat depths, neither buried by skim nor proud of the finish.
- Wide perforated wings: a generous mechanical keying surface for thick undercoat plaster, locking the profile in through the shrinkage and thermal movement of a multi-coat build-up.
- Rigid through the full 3 m: holds plumb and set line under the weight of thick plaster applied in multiple passes, with no bowing between fixing points when fixed at 600 mm centres.
Technical Specifications — 3 m Aluminium Wet Plaster Bead Data
| Property | Value |
|---|---|
| Length | 3,000 mm |
| Material | Extruded aluminium alloy, corrosion-resistant |
| Suitable plaster depth | 12–19 mm total finished depth (multi-coat wet plaster) |
| Internal angle | 90° |
| Wings | Perforated for mechanical plaster keying |
| Reaction to fire | A1 profile classification (assembly subject to system fire strategy) |
| Standard reference | BS EN 13914-2:2016 · BS EN 13658-2:2005, subject to system confirmation |
| Primary application | Internal multi-coat wet plaster on masonry, block, and concrete |
| Fixing method | Plaster dabs at max 600 mm centres or non-corrosive mechanical fixings |
| Application temperature | +5 °C to +30 °C, air and substrate |
| Storage | Dry, away from acidic atmospheres and de-icing salts |
| Pack | Single 3.0 m length; trade pack quantities available |
Dimensional data reflects the standard 12–19 mm wet plaster class for aluminium angle beads. Confirm against the current manufacturer's datasheet for warranty-critical or specification-governed work.
How the Wet Plaster Aluminium Bead Installs Into a Multi-Coat Plaster System
Bed the bead into the undercoat plaster ahead of the main wall coat. Apply dabs of the same undercoat to each wing at maximum 600 mm centres, press the profile square to the corner, and check plumb across the full 3 m with a long spirit level before the dabs grip. Plaster squeezing through the wing perforations forms the primary bond, so each dab must spread across the perforation pattern rather than sit as a single button on the wing face — a dab that misses the perforations holds nothing once the plaster cures.
Once the bead is set, apply the main undercoat across the full elevation and rule off to the nose as the depth gauge, within the open time of the undercoat material. The finish skim follows once the undercoat reaches the correct suction. The full sequence including stop bead and bellcast detailing at terminations is set out in the corner bead installation step-by-step guide, and corner-and-reveal detailing across complete elevations is covered in the render detailing around windows and doors guide.
Installation Notes — Conditions, Compatible Fixings, Cutting
Work within +5 °C to +30 °C ambient and substrate temperature, and confirm the background is sound, clean, and free of loose material before bedding the bead. Cut to length with metal tin snips or a fine-toothed hacksaw, and deburr the cut end with a file before fitting so joints butt tightly without standing edges.
Where mechanical fixings are needed in addition to plaster dabs, typically on hard low-suction backgrounds, use stainless steel or aluminium-compatible fasteners. Galvanised nails create a bimetallic contact point with the aluminium profile that can drive localised corrosion at the fixing under damp conditions, which is precisely the failure mode the aluminium specification is chosen to avoid. On thin skim-only work at 2–3 mm the PVC L250 plastering corner is the depth-matched profile, since this wet plaster nose is dimensioned for build-ups from 12 mm upward.
What UK Plasterers Do Differently With Aluminium Wet Plaster Beads
Many plasterers carry one bead spec for a whole house and fix it everywhere, but the room, not the building, is what should drive the material choice. Across internal plaster specifications supplied through Renders World, a heated well-ventilated lounge runs galvanised beads for decades without issue, while the kitchen, bathroom, and basement on the same job are where lingering drying-phase moisture attacks a zinc coating and telegraphs rust at the arris within a few years. Matching aluminium to the damp rooms and accepting cheaper beads elsewhere puts the budget where the failure risk actually sits.
- Fix at seven points per 3 m run, not four: dabs at 600 mm centres give seven fixing points and stop the bead deflecting under a thick browning coat between widely spaced supports.
- Specify aluminium for the room, not the building: upgrade to aluminium where ventilation is limited and drying-phase moisture lingers, and accept economy beads in dry, heated spaces.
- Check plumb at each intermediate dab: a long level and a steady push at every dab position locks the line before the undercoat closes over, where checking only the ends leaves a mid-run bow.
- Use compatible fixings only: stainless or aluminium-compatible fasteners preserve the corrosion advantage that galvanised nails would quietly undo at every fixing point.
How the Wet Plaster Aluminium Compares to the PVC Plastering Corner
Both profiles form the internal plaster corner, so the decision comes down to plaster depth and room environment rather than the corner detail. Read across to match the profile to your build-up before ordering.
| Variant | Key Spec | When to Choose |
|---|---|---|
| Wet plaster aluminium 3m corner bead | 12–19 mm depth · metal nose · 3 m run | Multi-coat wet plaster, damp rooms |
| PVC L250 plastering corner white | 2–3 mm skim depth · uPVC · 2.5 m | Skim-only plasterboard corners |
Is the Wet Plaster Aluminium Corner Bead Right for Your Project?
- Traditional multi-coat internal wet plaster at 12–19 mm total depth: the primary use case, where aluminium construction removes the rust-bleed failure mode of galvanised steel during the plaster drying phase.
- High-moisture internal rooms (kitchens, bathrooms, wet rooms, vaulted basements): the correct metal specification where ventilation is limited and moisture lingers in the plaster after application.
- Internal skim coats at 2–3 mm on plasterboard: the PVC L250 plastering corner is the depth-matched thin-coat profile, since this wet plaster bead would stand proud of a skim-only finish.
- External render corners on facade systems: the external corner aluminium 3.0 m is the matching metal profile, dimensioned for outdoor render build-ups with UV and weather exposure considered.
- Drier internal plastering where PVC is acceptable: the 6 mm PVC corner bead no mesh is a cost-effective alternative where corrosion resistance is not the governing factor.
The wet plaster aluminium 3 m bead is UK-stocked for next-working-day trade despatch at Renders World. One 3 m length covers a typical 2.4–2.7 m storey-height corner with the offcut available for short reveal returns, so count one bead per corner plus a small overage for cutting tolerance and deburred ends.
FAQ — Wet Plaster Aluminium Bead Specification and Installation
Why specify aluminium over galvanised steel for internal wet plaster?
The drying phase of freshly applied wet plaster is highly alkaline and moisture-saturated, which is exactly the environment in which a zinc coating on galvanised steel begins to fail. In a well-ventilated room the risk is low, but in a kitchen, bathroom, or basement the moisture lingers for weeks and the zinc starts to attack before the plaster has cured, producing rust bleed at the arris within a few years. Aluminium resists alkaline attack during this phase, which is why it is the preferred specification for damp internal rooms.
Can this bead be used on external render corners?
This profile is sized for internal wet plaster at 12–19 mm depth, so the nose geometry and wing dimensions are matched to browning and bonding coat thicknesses rather than external render build-ups. For external corners on render systems, specify the external-grade corner aluminium 3.0 m, which is dimensioned for outdoor render depths and the exposure conditions of a UK facade.
What fixings are compatible with the aluminium bead?
Use stainless steel nails or aluminium-compatible non-corrosive fixings when mechanical pins are required. Galvanised nails create a bimetallic contact between zinc and aluminium that can drive localised corrosion at the fixing point under damp conditions, undoing the durability advantage of choosing aluminium. Plaster dabs at maximum 600 mm centres remain the preferred fixing method on backgrounds with adequate suction.
How is the aluminium bead cut to length on site?
Cut with metal tin snips for clean, fast trims, or a fine-toothed hacksaw for square accurate ends at long lengths. Deburr the cut with a file or fine abrasive paper before fitting so the butt joint sits tight without a standing edge, and check the cut piece is plumb across the full run before the dabs grip.
Can the bead be used where the finish is a 2–3 mm skim coat only?
At 2–3 mm skim depth the nose of this wet plaster bead would stand proud of the finished surface, since it is sized for total plaster depths from 12 mm upward. For skim-only finishes on plasterboard, the PVC L250 plastering corner is the matched profile, with a thinner arris dimensioned to finish flush at standard skim coat thickness.
How many beads are needed for a typical UK room?
A standard UK storey-height internal corner runs around 2.4–2.7 m, so one 3 m bead covers one corner with the offcut available for short reveal returns. A typical bedroom with one chimney breast or partition return uses two to four beads, and a full re-plaster of a four-bedroom house tends to land in the 25–40 bead range depending on openings and partitions. Order with a small overage for cutting tolerance and any deburred ends discarded during fitting.