
Description
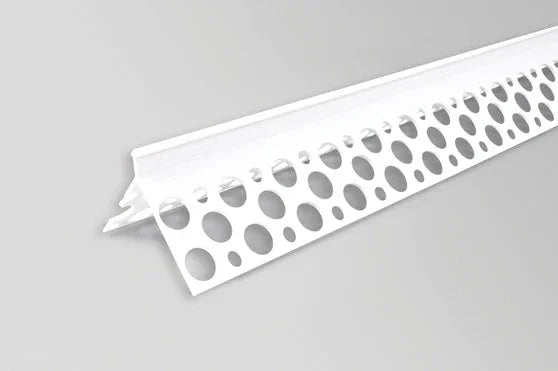
Matching corner bead nose depth to render system thickness is the specification decision that determines whether a finished arris reads as part of the facade or announces itself as a visible trim. The 10 mm PVC Render Corner Bead No Mesh 2.5 m is a rigid uPVC angle profile sized for traditional wet-render build-ups — sand-and-cement, monocouche, and lime-based systems running at 10–12 mm total depth — and is supplied as part of the render corner beads range at Renders World.
Where the 10 mm No-Mesh Corner Bead Performs Best on UK Renders
The 10 mm PVC corner bead no mesh is a rigid uPVC L-profile with a 10 mm nose and 40 mm perforated arms, sized for traditional UK render systems at 10–12 mm total finished depth, including sand-and-cement, monocouche, and lime-based wet renders. Rigid uPVC L-profiles without fibreglass wings work differently from mesh-wing beads: rather than embedding into a thin reinforced basecoat, they bed into a thick render coat and are over-rendered, with perforated arms locking the profile mechanically into the build-up.
The 10 mm nose sets the minimum render depth at the corner — on a 10–12 mm finish the arris sits flush with the topcoat; on shallower applications the nose stands proud and the bead reads as a deliberate trim rather than an integrated edge. The flush finish is what the no-mesh, fixed-nose profile is engineered to deliver across monocouche, sand-and-cement, and lime renders, where total system depths regularly reach 10 mm and above. That dimensional discipline is what separates a corner that disappears into the facade from one that announces itself under raking light.
Why UK Installers Choose the 10 mm No-Mesh Profile
- 10 mm nose for traditional render depth: sized specifically for sand-and-cement, monocouche, and lime-based systems at 10–12 mm total depth — the arris finishes flush with the topcoat rather than proud of it.
- 40 mm perforated arms: render keys mechanically through the perforations, giving a positive lock that does not rely on adhesive bonding or fibreglass mesh adhesion to remain secure through thermal cycling.
- Rigid uPVC body: alkali-resistant and dimensionally stable — holds its set line over the full 2,500 mm length under the weight of a thick-coat render, with no bowing or deflection mid-span.
- Single-stage corner detailing: no separate mesh layup or basecoat pass is required; the bead beds directly into the render coat, reducing corner operations to one continuous step on traditional render programmes.
- Lead-free, UV-stable formulation: the exposed arris retains its colour and impact resistance through the render's service life, in line with current European facade material expectations.
- Impact-resistant arris: the factory-extruded PVC nose absorbs knocks that would chip or spall a hand-floated cement corner, providing long-term edge protection at the most vulnerable point of any rendered elevation.
- Compliant with BS EN 13914-1&2:2016: the profile class meets the current British Standard for external rendering and internal plastering, subject to confirmation against the specific system specification in use.
Technical Specifications — 10 mm PVC Corner Bead Data
| Property | Value |
|---|---|
| Length | 2,500 mm |
| Nose depth | 10 mm |
| Arm width | 40 mm (per arm) |
| Internal angle | 90° |
| Suitable render depth | 10–12 mm total finished depth |
| Material | Exterior-grade rigid uPVC · alkali-resistant · lead-free · UV-stabilised |
| Mesh | None — perforated arms for mechanical render keying |
| Colour | White |
| Standard reference | BS EN 13914-1&2:2016 (subject to system confirmation) |
| Application temperature | +5 °C to +30 °C (air and substrate) |
| Storage | Dry, supported horizontally or vertically, out of direct sunlight |
| Pack size | Single 2.5 m length (trade packs also available) |
Dimensions and render-depth range are drawn from industry technical data for 10 mm uPVC render angle beads in this class. Confirm current manufacturer specification against the chosen render system for warranty-critical or BBA-governed applications.
How to Apply the 10 mm Corner Bead — Bedding, Fixing, and Rendering Over
Apply a continuous bed of render or adhesive mortar to each arm face before offering the bead up to the corner. Press the PVC arris square to the substrate so render squeezes through every perforation along both arms; gaps in the bedding are weak points that telegraph through the finish as fine cracks after the first thermal cycle. Check verticality with a long spirit level at one-metre intervals — the rigid uPVC holds whatever line you give it at the fixing stage, so any wave allowed during bedding reads through to the finished corner under raking light.
Where bedding alone is insufficient — exposed high-wind corners, very heavy build-ups, or substrates with low suction — secure the bead additionally with stainless or galvanised lost-head nails through the perforations, two per metre per arm. Trim ends with bead-cutting scissors or a fine-tooth saw rather than tin snips, which tend to crush the PVC nose and leave a frayed arris. Butt cut ends tightly at joints and render continuously across the join so the finish reads as a single uninterrupted line. For the full sequencing of corner detailing, including head and base terminations and the interface with stop and bellcast profiles, see the corner bead installation step-by-step guide.
Installation Notes — Conditions, Adhesion, and Finishing
For best result, fix and over-render in the same working session within the +5 °C to +30 °C window for both air and substrate temperature. Wet render applied below +5 °C risks early frost damage to the cementitious matrix, and uPVC fixed on a cold morning expands measurably through a warm afternoon, pulling on the bedding before the render has set. Keeping the bead and surrounding render moving together through the initial cure delivers the cleanest long-term arris.
On substrates with low suction — dense concrete, painted brickwork, smooth blockwork — a thin slurry coat of bonding render improves the keying of the bedding mortar to the wall, which in turn improves grip on the back of the perforated arms. On high-suction substrates such as aircrete or unsealed common brick, dampen the corner zone before bedding to prevent the wall pulling water out of the bedding mortar too quickly. Where the corner falls on a flexible substrate such as render carrier board, the principles change — review the render detailing around windows and doors guide for substrate-specific corner work.
Pro Tips From UK Installers Using the 10 mm Corner Bead
The most consistent specification error with no-mesh corner beads is matching the nose depth to the wrong layer. Many contractors select the 10 mm profile because total wall build-up is 10 mm, then find the nose proud once the finish coat goes on — because the finish coat is only a few millimetres of that total, and the nose was never going to disappear inside it. Match the nose to the total finished render depth, not the scratch coat or basecoat in isolation. On a two-coat sand-and-cement system at 12 mm total, the 10 mm nose sits at or just below flush; on a monocouche at 10 mm it reads as a clean geometric line.
- Bed both arms in one pass: back-buttering the bead with mortar before offering it up gives more consistent perforation fill than trying to push render through from the wall side after fixing.
- Cut with a saw, not snips: a fine-tooth hacksaw or bead-cutting scissors leave a square arris; tin snips crush the nose and leave a visible kink at every joint.
- Stack vertically in storage: 2.5 m lengths laid flat over time develop a slight bow that is hard to bed out — vertical or fully supported horizontal storage keeps the profile true.
- Allow 5–10% for cuts: on a typical two-storey semi with four external corners plus reveals, one full 2.5 m length per storey per corner plus 10% wastage is a reliable take-off figure.
- Fix and render the same day: bead fixed and left overnight in changing temperatures is bead working independently of its bedding — a common source of corner movement cracks on second visits.
Is the 10 mm No-Mesh Corner Bead Right for Your Project?
- Traditional wet render at 10–12 mm total depth (sand-and-cement, monocouche, lime): the primary use case — the 10 mm nose finishes flush with the topcoat, and the perforated arms key directly into the thick render without any separate mesh layer.
- Shallower traditional finishes at 6–8 mm depth: use the 6 mm PVC corner bead no mesh instead, where the smaller nose sits flush with a thinner finish coat.
- Heavier build-ups at 15 mm or more: step up to the 15 mm PVC corner bead no mesh to keep the arris flush with a deeper finish layer.
- Thin-coat silicone or acrylic systems at 1.5–3 mm topcoat: specify the mesh-wing corner bead instead, paired with Ceresit CT325 fibreglass field mesh for an integrated reinforcement layer.
- High-impact zones (ground-floor entrance returns, garage piers, commercial plinths): the 3 m aluminium corner bead provides substantially greater dent resistance for corners subject to regular pedestrian and vehicle contact.
Stocked for next-working-day despatch in trade quantities. Calculate one 2.5 m bead per external corner per storey plus 5–10% for cuts and joints, and confirm the nose depth against the specified render thickness on the same order to keep corner geometry consistent across the full facade.
FAQ — 10 mm Corner Bead Coverage, Compatibility, Ordering
What render thickness does the 10 mm nose suit?
The 10 mm nose is designed for a total finished render depth of 10–12 mm, which covers monocouche one-coat, traditional sand-and-cement two-coat, and lime-based render systems in that thickness range. Matching nose depth to total finish depth ensures the arris sits flush — a deeper finish buries the nose cleanly, and a shallower finish leaves it standing proud of the surface.
Do I need separate mesh with a no-mesh corner bead?
For traditional thick-coat renders the perforated arms provide the mechanical key, and a separate corner mesh layer is not normally specified. For systems that use a reinforced basecoat — thin-coat EWI silicone or acrylic renders — the corner bead should be a mesh-wing profile that embeds directly into the field reinforcement, not this no-mesh profile.
How many beads do I need per external corner?
One 2.5 m length per external corner per storey is the standard take-off, plus 5–10% additional length for cuts, joints, and short returns around bay windows or porch piers. On a typical two-storey UK semi with four main external corners, that translates to eight to ten 2.5 m lengths for the main elevations alone before any reveal or feature corner work.
Can I fix this bead with nails alone, without a render bed?
Nails alone are not the preferred method. Mechanical fixings through the perforations without a continuous render bed leave voids behind the arms that fill irregularly during over-rendering, and those voids become movement points once the render cures. A continuous bed of adhesive mortar or render remains the primary fixing method; nails serve as additional security on high-exposure or high-load corners.
Is this bead suitable for plinth corners or horizontal sill returns?
For plinths and sill returns where water tracks horizontally across the bead face, a standard corner profile does not provide drainage and can retain moisture against the substrate. Bellcast and drip-bead profiles are the correct selection for those locations, and the detailing sequence for each termination type is covered in the render detailing guide.
Will the white PVC arris discolour under UV exposure?
Once over-rendered, only the narrow nose arris remains exposed to daylight. The lead-free uPVC formulation is UV-stabilised for facade service life, and any gradual colour change across the exposed arris is uniform across the elevation — consistent with industry standards for exterior uPVC profiles in UK climate conditions.