
Description
A flush corner across a heavy traditional render, where the dubbing-out coat brings the wall back to plumb and the build-up reaches 15 mm or more, starts with a bead sized to the finished depth for trade specifiers working thick-coat and re-render elevations.
Where the 15 mm No-Mesh Corner Bead Performs Best on UK Heavy-Build Renders
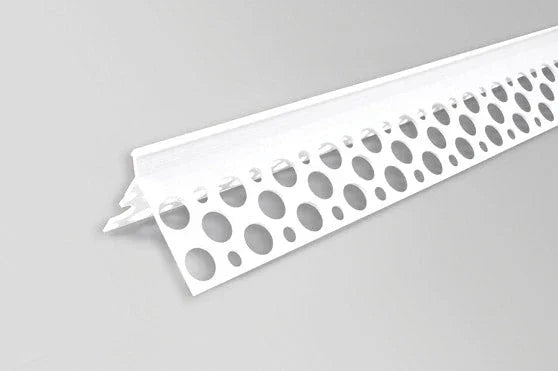
For a UK thick-coat render running at 14–17 mm total finished depth, the 15 mm PVC render corner bead no mesh delivers a flush arris where a 10 mm nose would stand proud of the topcoat. It is the deepest no-mesh profile in the render corner beads range, a rigid uPVC L-profile with a 15 mm nose, 4 mm visible arris, and 40 mm perforated arms.
The nose sets the minimum render depth at the corner: across heavy sand-and-cement, multi-coat traditional renders, and monocouche at the upper end of its range, the arris sits flush with or just below the topcoat rather than reading as a proud trim line. It resolves two problems the 10 mm bead cannot handle cleanly, which are walls dubbed out for plumb where total depth climbs past 15 mm, and re-rendering where a new coat over a retained existing coat accumulates to 15 mm or more at the corner. In both cases it is the straight-through specification, so the corner finishes in one pass rather than forcing a localised dub-down at every arris.
Why UK Installers Choose the 15 mm No-Mesh Profile for Thick Coats
- 15 mm nose for heavy render depth: sized for 14–17 mm total finished thickness, covering thick sand-and-cement, multi-coat traditional systems, heavy monocouche, and re-render build-ups beyond the 10 mm profile's range.
- Single-step corner geometry on dubbed-out walls: accommodates the full dubbing-out plus scratch-and-finish build-up in one fixing pass, with no secondary operation to bring the corner back to a shallower bead's range.
- Re-render specification without extra dubbing: when a new coat over retained existing render reaches 14 mm or more at the arris, this profile takes the depth straight through rather than forcing a dub-down at every corner.
- 40 mm perforated arms for mechanical lock: render keys positively through the full arm length, holding the bead in a heavy build-up under the weight and shrinkage stresses a thinner profile resists less reliably.
- Rigid uPVC body resistant to creep: the profile holds its set geometry from fixing through to cured finish without bowing or mid-span deflection, which matters where bead weight-bearing under thick coats is meaningful.
Technical Specifications — 15 mm PVC Corner Bead Data
| Property | Value |
|---|---|
| Length | 2,500 mm |
| Nose depth | 15 mm |
| Visible arris | 4 mm |
| Arm width | 40 mm per arm |
| Internal angle | 90° |
| Suitable render depth | 14–17 mm total finished depth |
| Material | Exterior-grade rigid uPVC · alkali-resistant · lead-free · UV-stabilised |
| Mesh | None — perforated arms for mechanical keying |
| Weight | 19.1 kg per 100 m |
| Colour | White |
| Fire classification | Class 1Y, self-extinguishing on removal of flame (BS 476, subject to system confirmation) |
| Standard reference | BS EN 13914-1&2:2016 class, subject to system confirmation |
| Application temperature | +5 °C to +30 °C, air and substrate |
| Pack size | Single 2.5 m length; trade packs available |
Specification data is drawn from industry technical references for 15 mm uPVC corner bead profiles in this class. Confirm against the current manufacturer's datasheet for warranty-critical or specification-governed applications.
How to Apply the 15 mm Corner Bead — Dubbed-Out Walls and Heavy Build-Ups
For the best result, dub out any significant wall irregularity and let that coat set firm before fixing the bead, because bedding into soft green dub allows the nose to shift and locks depth variation into the arris permanently. The sequence is dub first, check plumb, let the dub firm until it resists thumb pressure, then fix the bead into a set surface with a fresh render bed. Press the arris square to the corner until render squeezes through every perforation along both arms, and check verticality with a long level at one-metre intervals.
On multi-pass heavy build-ups, fix the bead before the scratch coat so the nose depth is set at the correct finished level from the start. Trim ends with bead-cutting scissors or a fine-tooth saw, butt joints tightly, and render continuously across each join so the finish reads as one uninterrupted line. For the full corner installation sequence across system types and bead profiles, see the corner bead installation step-by-step guide.
Installation Notes — Thick-Coat Cure Discipline and Re-Render Sequencing
Work within the +5 °C to +30 °C window for air and substrate, and bed the bead into the same mix that will form the surrounding scratch coat so bedding and coat cure as a single mass. On thick build-ups the cure is slower and early shrinkage greater than on a thin coat, so any disconnect between bedding mortar and a scratch coat applied a day later produces a hairline ring around the perforated arms at first thermal cycling. Same-mix, same-session bedding-and-scratch is the discipline that keeps the corner zone moving as one piece.
On re-render work, confirm the existing coat is clean, stable, and well-keyed before fixing the bead over it; a soft or chalky existing coat needs hacking back to masonry and rebuilding rather than overlaying. Where the corner sits at a transition between traditional render and an adjacent EWI elevation, pair with Ceresit CT325 fibreglass field mesh across the transition zone. The render detailing around windows and doors guide covers profile selection at each termination type across the elevation.
Pro Tips From UK Installers on Heavy-Build Render Corners
Many contractors reach for a 10 mm bead by habit on re-render jobs, then dub out the corners to bring the depth down to match, which adds a step and a drying wait the 15 mm bead would have avoided. Across corner-bead specifications supplied by Renders World for UK heavy-build and retrofit work, measuring corner depth before ordering is the single change that removes that extra operation: where the new coat over a retained existing surface will reach 14 mm or more at the arris, the 15 mm profile takes it straight through.
- Measure before you order: on re-render and dubbed-wall projects, hold a straight edge against the corner and measure to plumb at three heights per storey; the deepest reading sets the specification, not the average.
- Dub first, fix second: the dub coat must resist thumb pressure before the bead goes on, since anything softer locks substrate movement into the arris line permanently.
- Bed in the scratch-coat mix: same-session bedding-and-scratch keeps the corner moving as one piece through cure, where mixed batches a day apart shrink at different rates and telegraph as a hairline.
- Store flat or fully supported: at 19.1 kg per 100 m this is the heaviest no-mesh PVC profile in the range, so lengths left unsupported on edge will take a permanent sag.
How the 15 mm Bead Compares to Sibling No-Mesh Depths
The no-mesh corner beads share one job across three render depths, so selection comes down to matching the nose to the finished coat. Read across to confirm the 15 mm nose finishes flush on your system before ordering.
| Variant | Key Spec | When to Choose |
|---|---|---|
| 6 mm PVC corner bead no mesh | 6 mm nose · 6–8 mm depth | Shallow lime and fine finishes |
| 10 mm PVC corner bead no mesh | 10 mm nose · 10–12 mm depth | Standard thick-coat systems |
| 15 mm PVC corner bead no mesh | 15 mm nose · 14–17 mm depth | Heavy build-ups and re-render |
Is the 15 mm No-Mesh Corner Bead Right for Your Project?
- Thick traditional renders at 14–17 mm total depth (multi-coat sand-and-cement, heavy monocouche, dubbed-out walls): the primary use case, where the 15 mm nose finishes flush across the full range that shallower profiles would leave proud.
- Re-rendering over a sound existing coat reaching 14 mm or more: the correct specification to avoid an additional dubbing-out operation at the corners, provided the existing coat is clean, stable, and adequately keyed.
- Lighter traditional builds at 10–12 mm total depth: the 10 mm PVC corner bead no mesh is the closer match, since a 15 mm nose at 10 mm depth is buried rather than flush.
- Thin-coat silicone or acrylic EWI with reinforced basecoat: specify the corner PVC render bead with mesh instead, whose fibreglass wings integrate the corner into the field reinforcement rather than relying on the perforated-arm key alone.
The 15 mm no-mesh bead is a UK-stocked profile held for next-working-day trade despatch at Renders World. Calculate one 2.5 m length per external corner per storey plus 5–10% for cuts, and measure the expected finished render depth at the corners before ordering to confirm the 15 mm nose matches the depth the system will actually achieve.
FAQ — 15 mm Corner Bead Coverage, Compatibility, Ordering
What render thickness does the 15 mm nose suit?
The 15 mm nose is designed for a total finished render depth of 14–17 mm. At 14 mm the arris sits just below flush and at 15–17 mm it reads as a clean integrated edge. Below 14 mm the nose begins to stand proud, so the 10 mm or 6 mm no-mesh profiles are the closer specification depending on the actual system thickness.
Is this bead suitable for re-rendering over an existing coat?
For re-render scenarios where a new coat over an existing sound render brings total depth to 14–17 mm at the corners, this is the most direct specification, avoiding an additional dubbing-out operation at the arris and letting the new coat run in one continuous pass. Confirm the existing coat is clean, stable, and well-keyed before applying render over it.
Should I fix the bead before or after dubbing out?
Fix the bead after the dubbing-out coat has set firm. Bedding into soft dub allows the nose to shift as the green mortar moves, locking depth variation into the arris that cannot be corrected once the scratch coat follows. Allow the dub to resist thumb pressure without yielding before applying the render bed and fixing the bead.
How many 15 mm beads do I need per corner?
One 2.5 m length per external corner per storey is the standard take-off, plus 5–10% for cuts and joints on regular elevations. On heavy-build projects with stepped reveals, dubbed-out returns, or feature corners, allow closer to 10–12% because the heavier profile produces slightly more offcuts at angled cuts and joint trims.
Do I need separate reinforcement mesh alongside a no-mesh bead at this depth?
For traditional thick-coat renders the perforated arms provide the mechanical key and a separate corner mesh layer is not normally specified. Where the system uses a reinforced basecoat, as in thin-coat EWI, the corner should use a mesh-wing profile that embeds into the field reinforcement rather than this no-mesh profile, regardless of render depth.
Will the exposed 4 mm arris hold up under long-term UK exposure?
Once over-rendered, only the narrow 4 mm arris stays visible, and the lead-free UV-stabilised uPVC is formulated for full facade service life. Any gradual colour change across the exposed arris is uniform across the elevation, consistent with industry standards for exterior uPVC profiles in UK climate conditions.