BELLCAST BEADS
2 products
Showing 1 - 2 of 2 products
Within the render beads and mesh range at Renders World, bellcast beads are the horizontal drip profiles that protect rendered facades at their most moisture-vulnerable points — DPC level, above window heads, and at any horizontal termination where rainwater must be actively thrown clear of the substrate. This focused collection offers two PVC drip profiles in 10 mm and 15 mm depths, covering thin-coat silicone, EWI, monocouche, and traditional sand-cement render build-ups across the wettest elevations the UK climate produces.
What Bellcast Beads Do in a Render or EWI System
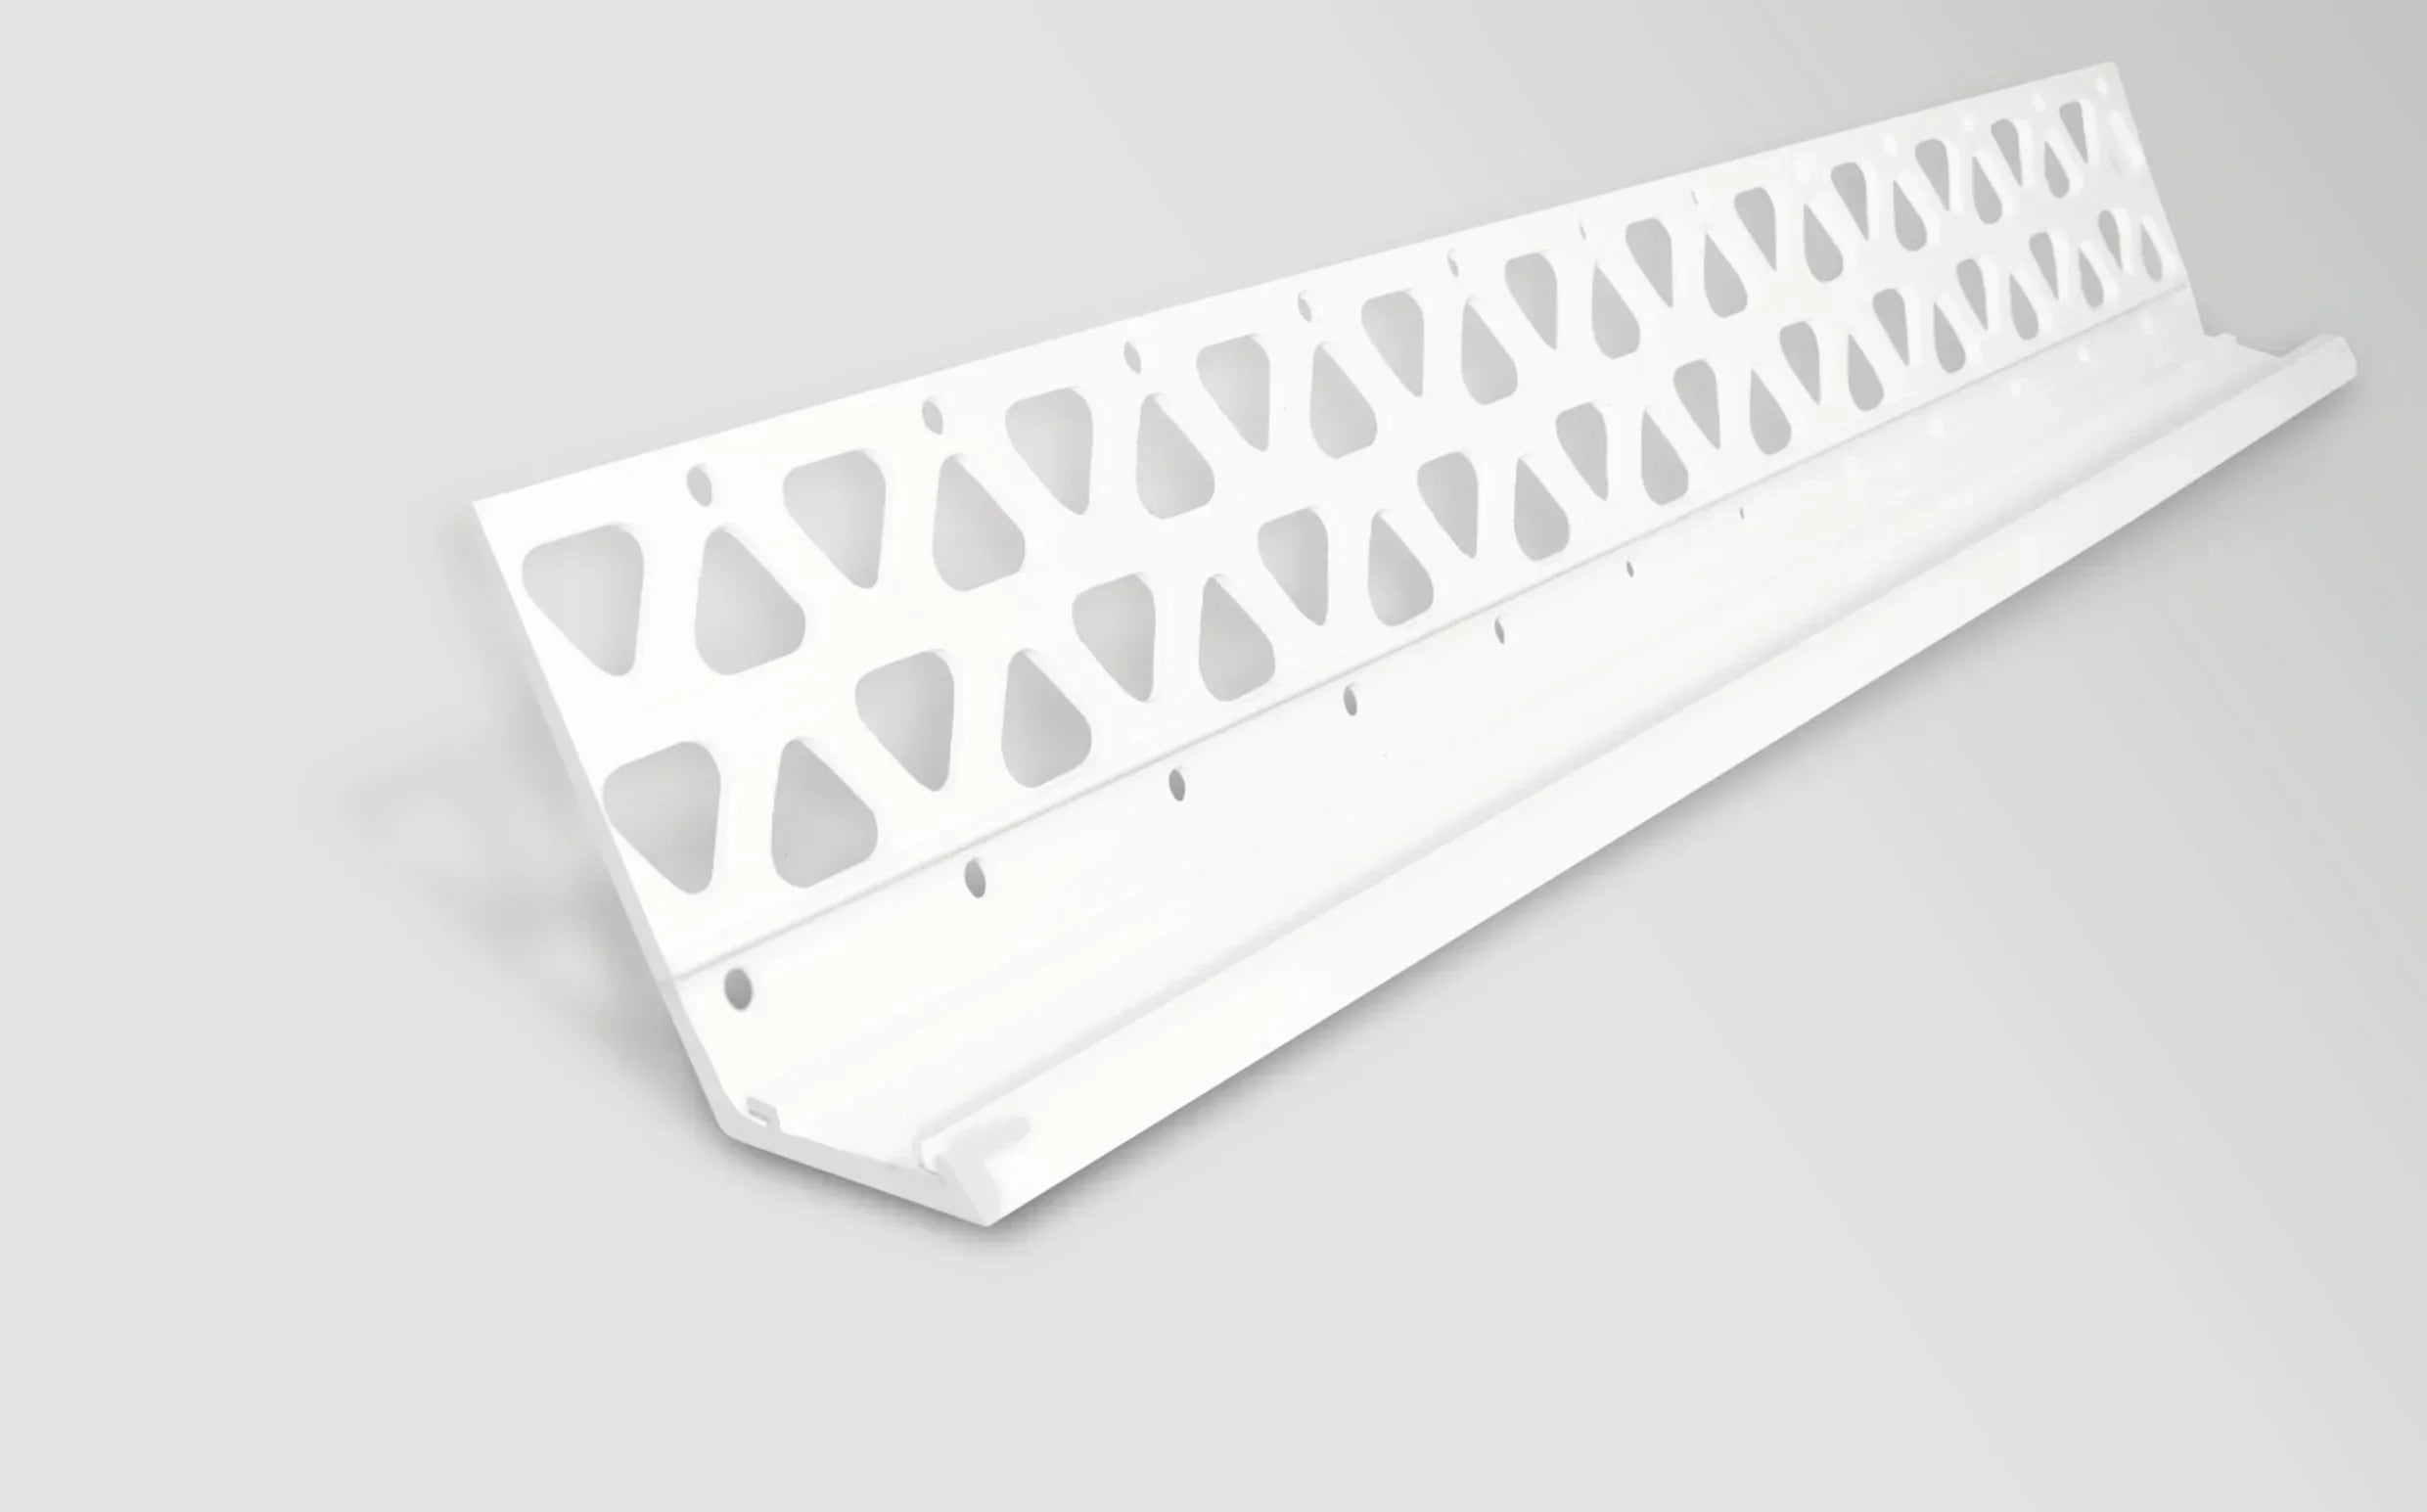
A bellcast bead is a rigid PVC profile with a bell-shaped drip lip angled outward at approximately 115 degrees, creating a capillary break at horizontal render terminations. When rainwater reaches the drip nose, surface tension is broken and water falls vertically away from the wall rather than tracking back along the underside of the render edge — the single detail in line with BS EN 13914-1 principles that separates a weatherproof plinth from one prone to recurring damp and biological colonisation.
The collection provides two profiles matched to render build-up depth. The 10 mm bead in 3.0 m lengths suits thin-coat silicone, silicate-silicone, and standard EWI topcoat systems where the render element falls between 4 mm and 10 mm. The 15 mm bead in 2.5 m lengths is sized for machine-applied monocouche at 12–15 mm and traditional sand-cement two-coat renders at 14–18 mm, where the deeper nose finishes flush with the heavier coat.
What Makes Bellcast Beads Worth Specifying
- Active rainwater deflection at the base of the wall: The curved drip lip throws water vertically clear of the substrate, protecting plinths and lower masonry from splash-back, rising damp, and the algae growth that takes hold on unprotected base-of-wall zones through wet UK winters.
- Capillary break that holds for decades: The bell-shaped nose interrupts the surface-tension pathway that allows water to track horizontally beneath an unprotected render edge, closing the primary route by which moisture reaches the insulation or masonry behind.
- Non-corrosive PVC construction: UV-stabilised PVC produces no oxide staining beneath light-coloured silicone or acrylic finishes, where galvanised steel alternatives can bleed rust marks through the topcoat after several wet seasons.
- Integrated depth gauge: The upper wing doubles as a screed reference at the base of the wall, ensuring the render coat finishes flush with the drip nose for a clean horizontal termination line that holds true across the elevation.
- Ground-level impact resistance: The rigid profile absorbs impacts from foot traffic, garden equipment, strimmers, and hard landscaping in the exact zone where rendered walls take the most repeated physical contact.
- Compatible across major UK render systems: Both depths work with Atlas, Ceresit, and Roker basecoats and with every silicone, acrylic, silicate-silicone, monocouche, and traditional sand-cement topcoat stocked at Renders World.
Selection Guide — Find Your Bellcast Profile
Identify the render build-up depth at the termination edge, read across to confirm the matching profile, and select in 30 seconds. The 10 mm bead is the default for modern EWI and thin-coat work; the 15 mm bead is the answer for monocouche and traditional sand-cement systems.
| Your Project | Best Bellcast Bead | Standout Spec |
|---|---|---|
| Thin-coat silicone, silicate-silicone, EWI topcoat (4–10 mm) | Bellcast Bead White 10 mm 3 m | 10 mm · 3.0 m · UV-stable PVC |
| Monocouche, traditional sand-cement, thick mineral (12–18 mm) | Bellcast Bead White 15 mm 2.5 m | 15 mm · 2.5 m · UV-stable PVC |
How Bellcast Beads Install in a Render or EWI System
Bellcast beads are positioned at a minimum of 150 mm above finished ground level — or at DPC level, whichever is higher — and above window and door heads on exposed elevations where active water deflection is needed. The upper wing is embedded into a continuous bed of basecoat or EWI adhesive, with any mesh wings overlapping the main fibreglass reinforcement sheet by at least 100 mm to keep the tensile network continuous across the termination. On EWI systems the bellcast forms the moisture break between the rendered facade zone above and the below-DPC plinth zone most exposed to ground-contact wetting and splash-back.
For the complete installation method — adhesive bed preparation, alignment to a level datum, mechanical fixing on awkward substrates, jointing on longer runs, and movement-joint detailing on multi-storey elevations — the bellcast bead installation and water protection guide sets out the full trade process with worked site examples. For coordinating bellcasts with stop beads, corner beads, and oversills around window and door openings, the render detailing guide for windows and doors covers the profile sequencing process across every common junction type.
What UK Installers Do Differently With Bellcast Beads
Most bellcast failures on UK sites are not product defects — they are render overshooting the drip lip, or profile sequencing handled in the wrong order. A handful of trade habits consistently keep both problems off the elevation.
- Fix bellcasts first on every elevation: Bellcasts establish the lower datum from which stop beads and corner beads sequence upward; setting them after adjacent profiles creates a cold joint at the horizontal-vertical junction that consistently opens during the first winter thermal cycle.
- Run a blade along the drip lip before full cure: Even 2–3 mm of render creeping past the bell-shaped edge bridges the capillary break and bypasses the drip function entirely; a 30-second blade pass per linear metre after the final coat firms preserves years of facade performance.
- Plan the bellcast run before scaffolding goes up: Confirming the level datum at DPC and above each opening pre-scaffold prevents the rework that happens when bead lines are eyed in at height; on multi-storey work this single planning step removes the highest-cost source of profile-sequence rework.
- Leave 5 mm between bellcast and vertical stop beads: Where a vertical stop bead lands above the bellcast, cut the stop to finish 5 mm above the bellcast nose and seal the gap with low-modulus sealant — two rigid PVC profiles bearing against each other crack the render at the junction under thermal movement.
- Position 150 mm minimum above ground: Below this height the drip throws water onto hard landscaping that splashes straight back onto the lower wall, undoing the deflection the bead was installed to provide.
Is a Bellcast Bead Right for Your Project?
- DPC-level drip protection on rendered facades: Both the 10 mm and 15 mm profiles deliver active rainwater deflection at the base of the wall, preserving the plinth zone from damp, staining, and biological growth across the full facade lifespan.
- Drip detail above window and door heads: On exposed and weather-side elevations, a bellcast above each opening prevents water running down glass and into frame seals — a detail that extends the service life of both the render and the window unit.
- Clean vertical or soffit terminations without a drip: Where the render terminates in a flat straight edge rather than a drip lip — at window jambs, soffits, and material transitions — a render stop bead provides the flat-nosed profile for that junction.
- Impact-resistant external wall corners: Where a vertical arris needs reinforcing against mechanical damage rather than water deflection, a render corner bead provides the 90-degree profile designed for external corner protection.
- Need depth advice for your render build-up? Match bead depth to measured finish thickness rather than headline specification, and our technical desk can confirm the right profile against elevation drawings on request.
FAQ — Bellcast Bead Installation and Compatibility
Where should bellcast beads be installed on a rendered wall?
At every horizontal point where the render coat terminates and rainwater must be actively deflected. The primary position is at DPC level — a minimum of 150 mm above finished ground level — where the rendered facade meets the plinth zone. They are also specified above window heads and door frames on exposed elevations to prevent water running into frame seals, and at horizontal transitions between rendered surfaces and adjacent cladding materials such as timber boarding or composite panels.
Which depth do I need — 10 mm or 15 mm?
Match the bead depth to the render build-up at the termination edge. The 10 mm profile suits thin-coat silicone, silicate-silicone, and standard EWI topcoat systems where the render element measures 4–10 mm. The 15 mm profile is sized for heavier work — machine-applied monocouche at 12–15 mm and traditional sand-cement two-coat renders at 14–18 mm. A bead shallower than the render buries the drip nose and loses its function; a bead deeper leaves the nose exposed to mechanical damage at ground level.
How many bellcast beads does a typical house need?
Measure the total horizontal run at DPC level plus any window and door heads requiring a drip detail, divide by 3.0 m for the 10 mm profile or 2.5 m for the 15 mm, round up, and add 10% for cuts and waste. A typical three-bedroom semi-detached property usually requires 15–20 linear metres across all elevations, representing one of the lowest-cost components in the render system relative to the moisture problems it prevents.
Can bellcast beads be painted to match a coloured render?
Yes. The PVC profile accepts exterior silicone masonry paint after light surface preparation with a suitable plastic primer. On most projects the upper wing is concealed beneath the topcoat during normal application, so a separate painting step is only needed where a deliberately exposed drip edge forms part of the architectural detail, or where the drip lip protrudes beyond the render face on a dark-coloured facade and a white nose line would otherwise be visually prominent.
What is the difference between a bellcast bead and a stop bead?
A bellcast bead includes a curved drip lip that actively throws rainwater clear of the wall surface, providing capillary-break protection at the base of the rendered area and above openings. A stop bead creates a flat, straight termination edge with no water-shedding feature, suited to frame junctions, soffits, and material transitions where water run-off is managed by the adjacent detail. The two profiles are complementary rather than interchangeable — most rendered elevations use both in combination.