
Description
Mounting accessories on a finished EWI facade needs a fixing that grips the insulation without bridging through to the masonry behind. A standard heavy-duty plug would defeat the thermal envelope, and a bare screw into render would tear out under load — the spiral anchor grips the EPS board itself, spreading load across an 85 mm helical engagement length.
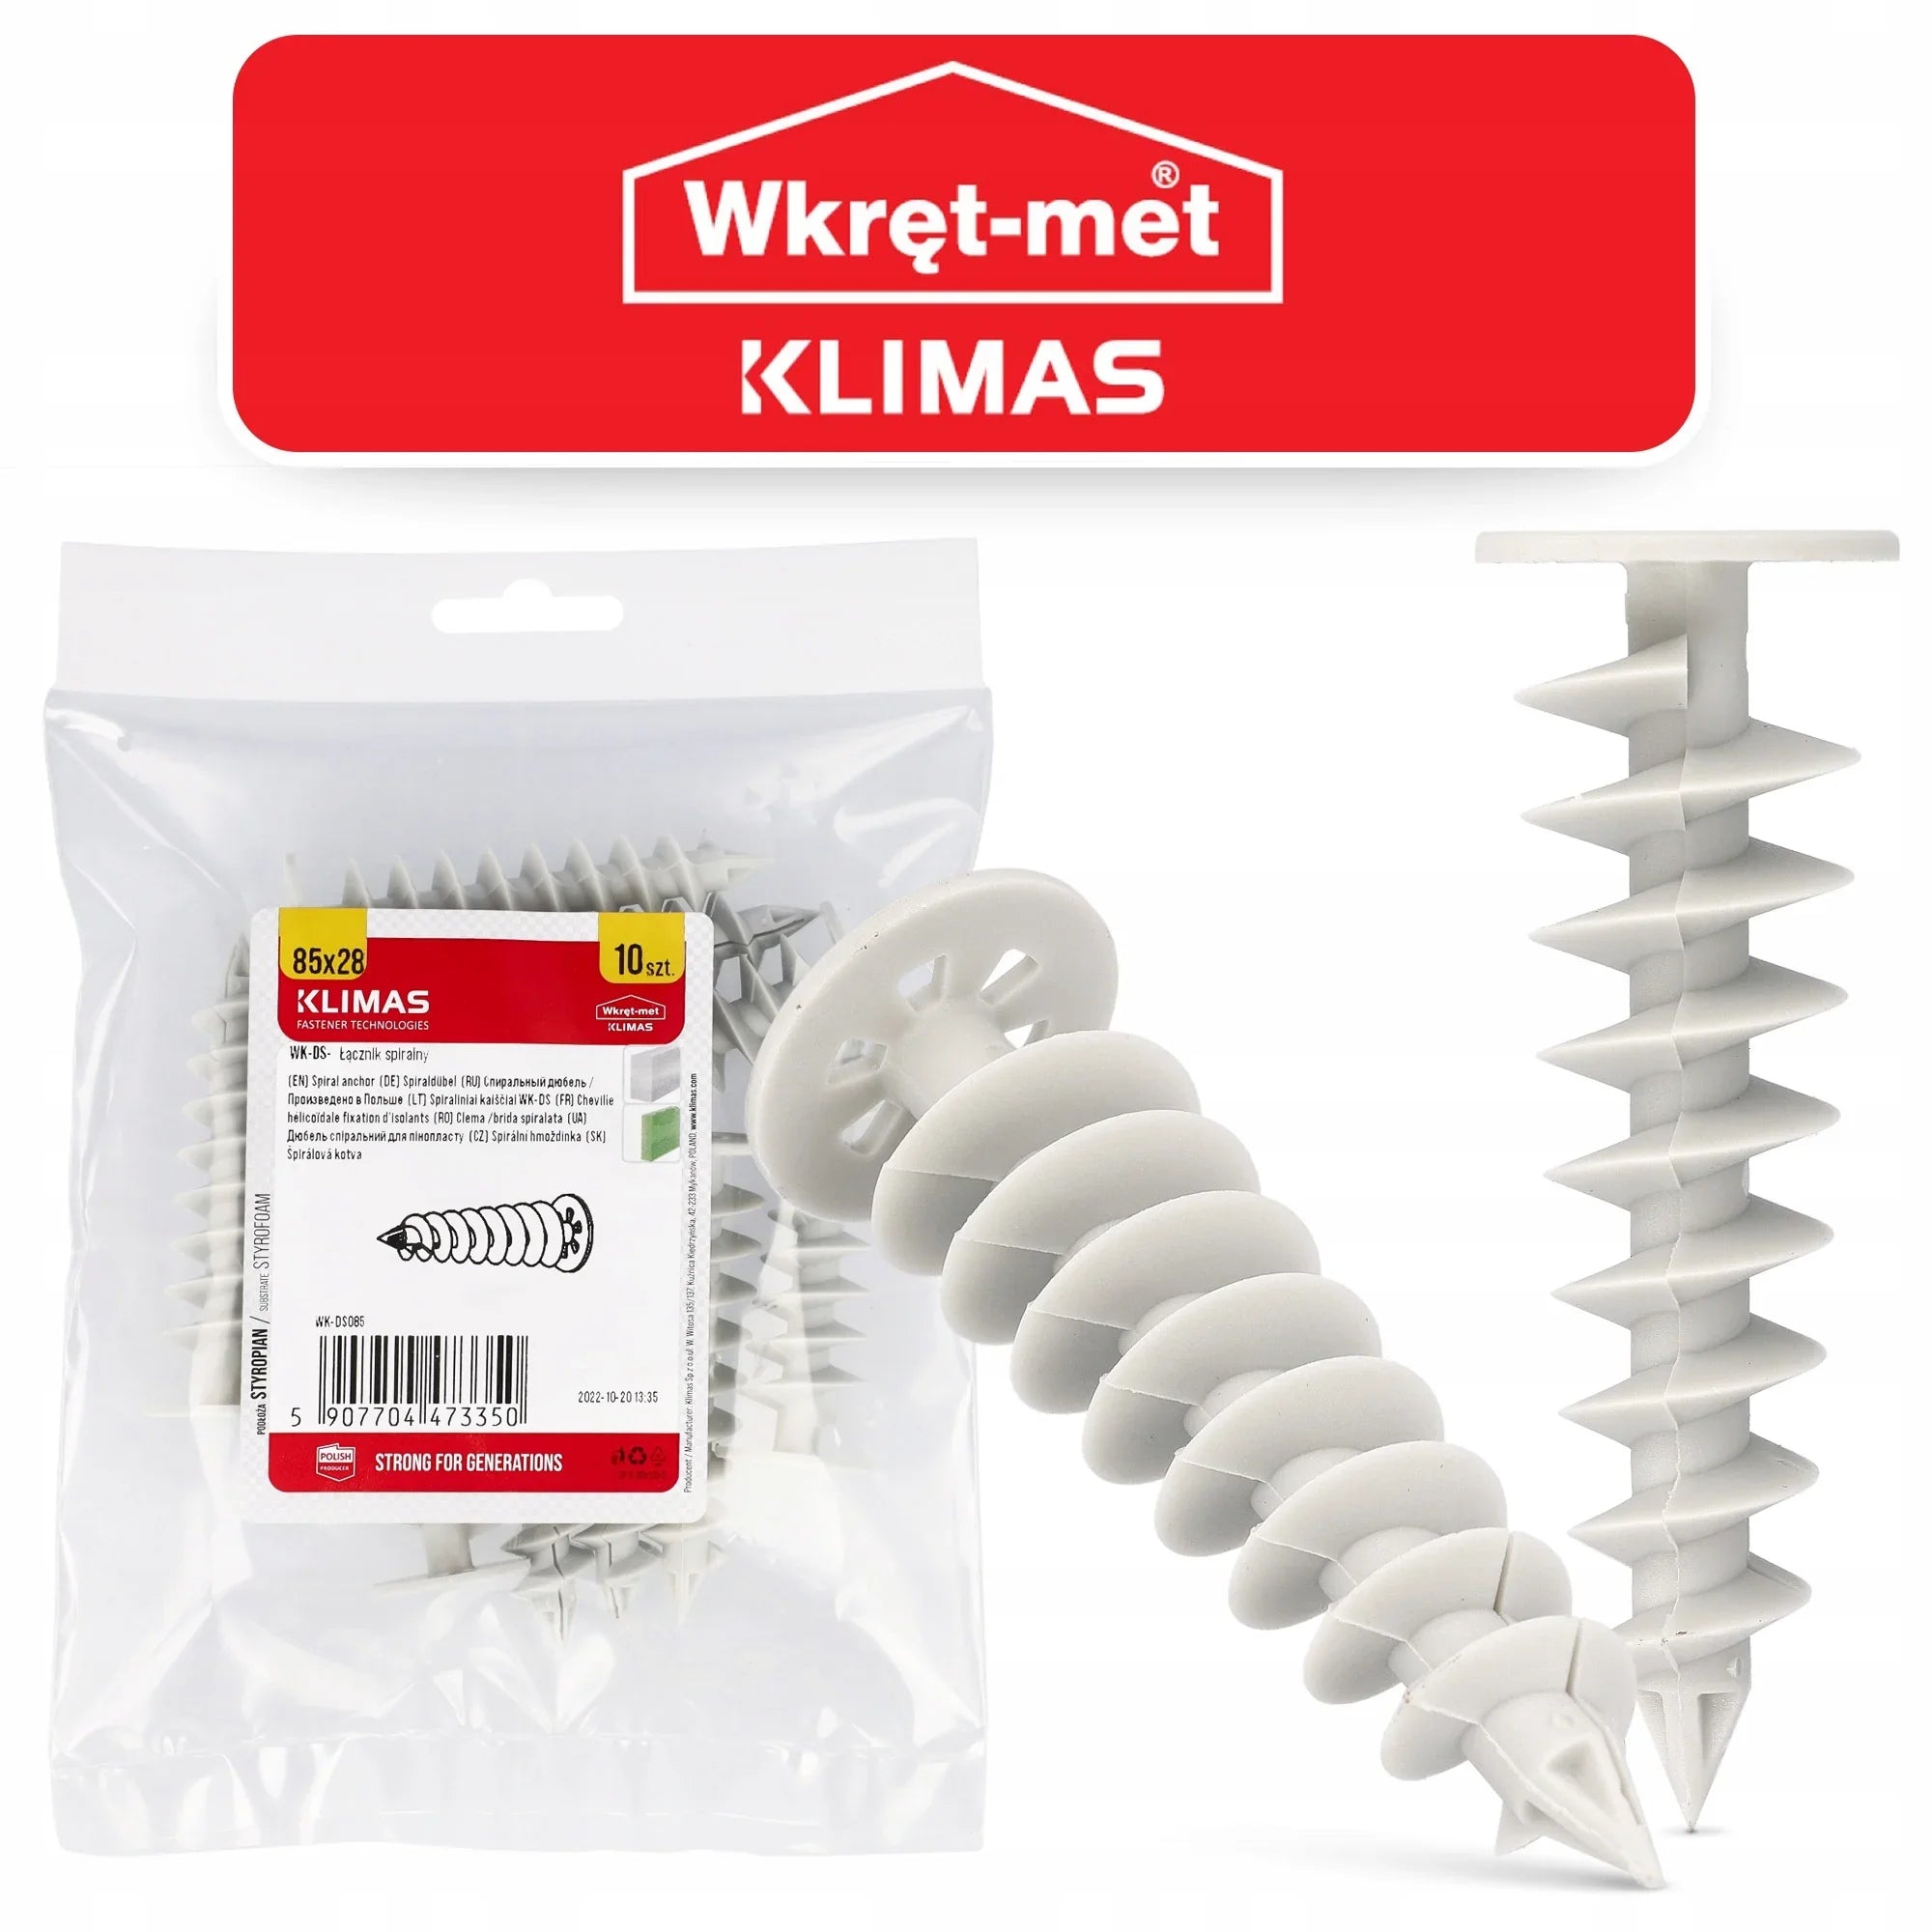
What the WK-DS085 Spiral Anchor Does on a Finished EWI Facade
The WK-DS085 is an 85 mm polyamide helical screw-in anchor from Klimas Wkręt-met that mounts non-structural facade accessories up to 5 kg to a finished EPS-insulated wall without creating a thermal bridge. Stocked within the EWI fixing accessories range at Renders World, the spiral thread cuts through render, basecoat, and insulation in one drive action, gripping the EPS cell structure and leaving the masonry behind completely untouched.
That sequence — render cured, then anchor installed — separates the WK-DS085 from primary board plugs, which secure the insulation during the build-up phase. The spiral anchor exists for what comes afterwards: house numbers, mailboxes, motion sensors, lighting brackets, and signage that owners want back on the facade once the render has cured. Each unit handles items up to 5 kg, which covers the vast majority of domestic facade accessories without resorting to through-fixings.
- On the facade — grips the cured render-and-EPS layer directly, so accessories mount cleanly after the finish is on.
- On the system — carries no significant heat to the substrate, keeping the continuous insulation envelope intact at every fixing.
- On the finish — the 28 mm head seats flush with the render, ready to render or paint over where an invisible result is wanted.
Why Trade Specifiers Choose the WK-DS085 Spiral Anchor
- Zero thermal bridging at the fixing point — the polyamide body carries no significant heat to the substrate, so no cold spot, no condensation risk, and no ladybird pattern showing through a dark render finish.
- 85 mm length sized for domestic EWI thicknesses — grips securely in EPS boards of 80 mm and above, covering most UK retrofits using 80–100 mm boards from the graphite EPS insulation range.
- 5 kg static load capacity per anchor — sufficient for house numbers, name plates, signage, small mailboxes, PIR sensors, lighting brackets, and cable clips.
- TORX-30 drive for slip-free engagement — the 28 mm head drives without cam-out at low speed, preserving the render face and avoiding the chipped craters a Phillips drive can leave.
- No pre-drilling required in EPS — the helical thread self-cuts through render and insulation in one drive; a complete installation takes roughly ten seconds with a cordless drill.
- Weather-resistant polyamide construction — resists UV, moisture, frost cycles, and alkaline render chemistry across the full UK service life of the system above it.
Technical Specifications — WK-DS085 Data Sheet Highlights
| Property | Value |
|---|---|
| Designation | WK-DS085 |
| Manufacturer | Klimas Wkręt-met |
| Anchor length | 85 mm |
| Head diameter | 28 mm |
| Socket type | TORX-30 |
| Compatible screw diameter | 4.5 mm |
| Material | Polyamide |
| Maximum static load per anchor | 5 kg (non-structural) |
| Compatible insulation | EPS (white and graphite), XPS |
| Suitable insulation thickness | 80 mm and above |
| Pack quantity | 10 pcs |
The 85 mm helical length is sized to the standard domestic EWI board depths of 80 mm and above. Confirm the actual board thickness on the facade before ordering, and step down to the shorter variant for reveals and soffits.
How the WK-DS085 Installs Into a Rendered Insulation Facade
The WK-DS085 goes in only after the EWI build-up is complete: insulation bonded and mechanically fixed with primary plugs, basecoat and mesh applied, render cured. At that point the anchor screws straight into the rendered facade at the marked position using a cordless drill with a TORX-30 bit at 400–800 rpm. The helical thread cuts through render, basecoat, and EPS in one action, with no pilot hole — so the accessory is back on the wall within a minute of marking its position.
Drive the anchor until the 28 mm head sits flush with or fractionally below the render face; proud heads catch on mounted items, and over-driven heads damage the render around the fixing. Once seated, a 4.5 mm stainless steel screw passes through the item and into the TORX-30 socket, tightened until the item sits firm without crushing the render at the contact point.
- Drive speed — 400–800 rpm; higher speeds melt the polyamide thread tip, lower speeds stall before the head seats.
- Screw spec — 4.5 mm diameter, stainless steel for external exposure, length selected to the thickness of the mounted item.
- Edge distance — minimum 50 mm from any board edge or visible joint line in the insulation behind.
- Multiple-point fixings — one anchor per hole, driven to identical depth for a level installation.
For the wider context of mechanical fixings — primary board plugs, base tracks, and where through-fixings to the substrate become necessary instead of spiral anchors — the complete EWI fixings installation guide covers the full method, and the fixing pattern and spacing calculation method works through the primary fixing density that runs underneath the render before any spiral anchor goes in.
Installation Notes — Drive Speed, Screw Selection, Edge Distance
Drive speed is the single setting that decides whether a WK-DS085 installs cleanly or chews up the render face. A cordless drill at 400–800 rpm gives the helical thread time to cut through render and insulation without overheating the polyamide tip. Impact drivers work in pulse-mode at low torque only — continuous high-impact drives risk shearing the head off the body. Test on an offcut of the actual render system before committing to a visible facade position.
Screw selection matters as much as the anchor. Use a 4.5 mm stainless steel screw; galvanised mild steel rusts at the head over a UK winter and stains the render within two seasons. Length follows the item: pass through the fixture, leave enough thread to fully engage the TORX-30 socket, but do not bottom the screw hard against the inside of the anchor.
Edge distance is the third discipline. Keep every anchor at least 50 mm from any insulation board edge or joint visible behind the render — the helical thread needs a continuous volume of EPS to develop full grip, and a fixing too close to a joint can split the cell structure and drop the holding load below the rated 5 kg.
What UK Installers Do Differently With Spiral Anchors
Spiral anchors are simple to install but easy to misuse — and three habits separate a clean facade mounting from a callback in eighteen months.
- I always weigh the item before specifying the anchor. The 5 kg limit sounds generous until a cast-iron house number or a heavy coach lantern lands on the scales; items over 5 kg need a through-fixing with a thermal isolating sleeve, because the insulation itself becomes the limiting factor.
- I always set drill speed before approaching the facade. 400–800 rpm gives a clean cut; a two-second test on a render offcut at the start of the day saves remedial filling later.
- I always keep anchors 50 mm clear of board joints. The render hides where the boards meet, but the helix does not — a fixing on a joint splits the EPS edge and loses half its holding load.
- I always specify stainless screws, never galvanised mild steel. A rust-streaked house number on fresh white render is the visible failure that ends up on a snagging list; the stainless premium is pence per fixing against remedial render work.
How the WK-DS085 Compares to the WK-DS050 Sibling Anchor
The two spiral anchors in the range share every property except length, which is what matches each one to a board depth. The comparison below shows which suits your facade.
| Variant | Key Spec | When to Choose |
|---|---|---|
| WK-DS050 | 50 mm length · 5 kg · TORX-30 | Thinner 30–50 mm reveal and soffit boards |
| WK-DS085 (this product) | 85 mm length · 5 kg · TORX-30 | Standard 80 mm+ domestic EWI boards |
Both share the same 28 mm head, TORX-30 drive, polyamide body, 4.5 mm screw compatibility, and 5 kg static load rating — so the choice comes down purely to matching anchor length to the insulation depth at the mounting position.
Is the WK-DS085 Spiral Anchor Right for Your Project?
- For mounting lightweight accessories on completed EWI facades — specify the WK-DS085 for house numbers, signage, mailboxes, sensors, lighting brackets, and cable clips up to 5 kg on EPS-insulated walls of 80 mm and thicker.
- For thinner reveal and soffit insulation (30–50 mm) — the WK-DS050 50 mm spiral anchor uses the same thread, head, drive, and load rating at a shorter engagement length suited to reveals and junction detailing.
- For heavier or dynamic loads — shutters, awnings, satellite dishes, and any item above 5 kg need a through-fixing to the structural substrate; the full fixing accessories collection covers heavy-duty alternatives.
- For mineral wool facades — the helical thread is optimised for EPS cell structure and does not develop the same grip in fibrous slabs from the Rockwool mineral wool range, where through-fixings with thermal isolating sleeves are the reliable approach.
- For trade-account ordering and specification support — pair WK-DS085 quantities with matching 4.5 mm stainless screws on a single PO; the Renders World specification desk can size the schedule against the building's accessory list before you commit to volume.
FAQ — WK-DS085 Load Limits, Compatibility, Ordering
Are screws included in the 10-piece pack?
No. The pack contains 10 anchor bodies only. Screws are selected separately because the correct length depends on the item being mounted — a thin steel house number needs a 15–20 mm screw, while a wooden plaque may need 30 mm or more. A 4.5 mm stainless steel screw matched to the item thickness pairs correctly with the TORX-30 socket in every WK-DS085.
Can I use the WK-DS085 on mineral wool insulation?
The helical thread is optimised for the closed-cell structure of expanded polystyrene, where the thread shears a clean groove that grips on installation. In mineral wool the fibrous matrix compresses around the thread rather than shearing, reducing pull-out load. Some high-density dual-density slabs hold the anchor acceptably for very light items, but the safer specification on a mineral wool facade is a through-fixing with a thermal isolating sleeve to the substrate.
How close to a board edge can I install an anchor?
Keep a minimum 50 mm from any board edge or joint line in the insulation behind the render. The helical thread needs a continuous volume of EPS to develop full grip; installing closer risks splitting the board edge and dropping pull-out resistance below the 5 kg rating. Pre-marking the EPS layout during the build-up, or referring to the as-built fixing record, pays back on every accessory installation afterwards.
What is the difference between the WK-DS085 and the WK-DS050?
The difference is anchor length. The 85 mm WK-DS085 suits boards of 80 mm and above — standard domestic EWI thicknesses. The 50 mm WK-DS050 is sized for thinner 30–50 mm boards used in reveals, soffit returns, and junction detailing. Both share the same 28 mm head, TORX-30 drive, polyamide construction, 4.5 mm screw compatibility, and 5 kg static load rating.
Can I render or paint over the anchor head after installation?
Yes. The 28 mm polyamide head accepts basecoat and render finish without adhesion issues. For an invisible result, skim a thin coat of basecoat over the seated head, allow it to cure, and touch up with the matching render texture to blend the patch. Most installations leave the head visible because items mount directly onto it, but the patch-over method restores the finish cleanly where a fixing is moved.
Can I double up two anchors to mount items heavier than 5 kg?
The rated 5 kg reflects the holding capacity of the helical thread in EPS, not the strength of the anchor itself. Beyond 5 kg per point the insulation cell structure becomes the limiting factor, and a second anchor close by does not double the capacity reliably — the boards crush under combined loading rather than holding twice the weight. For items above 5 kg, specify a through-fixing with a thermal isolating sleeve to the masonry or timber substrate.
What happens to the anchors at end of life?
Polyamide is recyclable through standard engineering-plastics recovery streams when the system is eventually stripped at demolition or refurbishment. The anchors separate cleanly from the screws — magnetic sorting recovers the stainless steel, and the polymer goes through the polyamide stream. The embodied carbon per anchor is small relative to the insulation and render layers above it.