
Description
The Corner PVC Render Bead with Mesh 2.5m is a coextruded uPVC L-profile with 145 g/m² alkali-resistant fibreglass wings, engineered for external 90° corners on EWI build-ups and direct-to-substrate thin-coat render systems. It sits within the render corner beads range at Renders World and integrates with Atlas, Ceresit, and comparable thin-coat systems across EPS, graphite EPS, XPS, mineral wool, and render carrier board substrates.
What This PVC Corner Bead with Mesh Does in a Render or EWI System
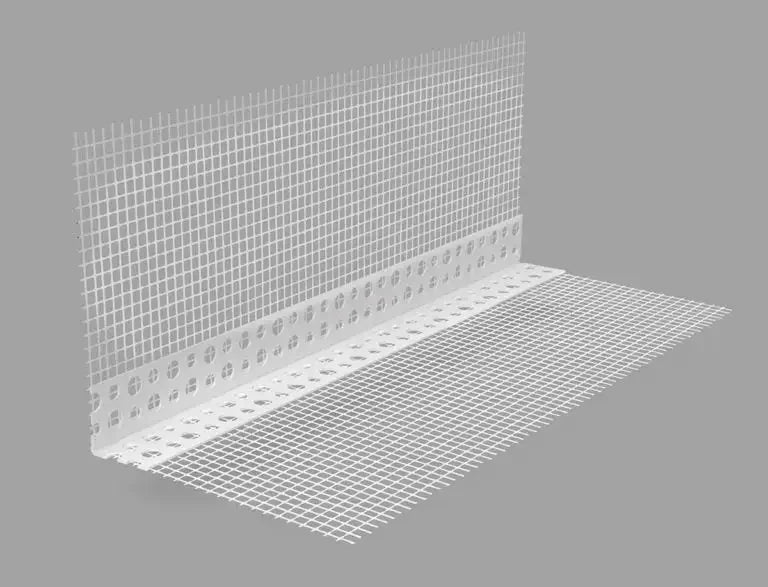
This 2.5 m coextruded uPVC bead carries a 100 mm fibreglass mesh wing on each face at 145 g/m², bonded to the PVC core during manufacture so the wings cannot peel, lift, or displace during handling. The profile is embedded inside the basecoat — not surface-fixed — so the wings overlap with the system's field reinforcement mesh and transfer thermal, wind, and impact stress away from the arris into the wider reinforced facade. The result is a corner that behaves as a unified composite element rather than three weak interfaces meeting at a point.
The 2,500 mm length suits standard storey heights and window-reveal returns with minimal on-site cutting, and the 88° inner angle springs to a true 90° once embedded in the wet basecoat. For installers detailing first-time EWI corners or specifiers verifying the build-up sequence, the corner stage is one of the few facade hours where getting the embedment right pays back over the full 25-year service life of the system.
Why Specifiers Choose This Coextruded PVC Mesh-Wing Bead
- Coextruded mesh-to-PVC bond — wings and core are joined during manufacture, eliminating the peel and displacement risk of stapled or post-bonded mesh.
- 145 g/m² alkali-resistant wings — full tensile performance preserved in the high-pH basecoat environment, with 100 mm width per side for genuine overlap continuity with field mesh.
- Crisp arris geometry across 2,500 mm — the rigid PVC core holds a straight line under raking light that hand-floated or masking-tape methods rarely match at scale.
- Lead-free UV-stabilised uPVC — the visible nose resists yellowing, embrittlement, and dimensional change across UK facade service conditions.
- Single-pass embedment — no plugs, no wall fixings, no intermediate cure; the bead sets into the basecoat strip in one trowel pass.
- System-wide compatibility — works with Atlas, Ceresit, and comparable thin-coat build-ups on EPS, graphite EPS, XPS, mineral wool, and render carrier boards.
Technical Specifications — Corner PVC Render Bead with Mesh 2.5m
| Property | Value |
|---|---|
| Length | 2,500 mm |
| Arm (PVC wing) dimensions | 21.5 × 21.5 mm |
| Internal angle | 88° (sprung to 90° in service) |
| Mesh weight | 145 g/m² |
| Mesh width per wing | 100 mm |
| Mesh type | Alkali-resistant E-glass fibreglass, coextruded bond |
| PVC material | Alkali-resistant uPVC, lead-free, UV-stabilised |
| Application temperature | +5 °C to +30 °C (air and substrate) |
| Storage | +5 °C to +30 °C, horizontal, dry, shaded |
| Pack | Single 2.5 m length (trade packs of 50 available) |
Specification confirmed against the Retek manufacturer datasheet linked in the Technical Documentation section. Confirm current TDS against the specific basecoat system used for warranty-critical or BBA-governed installations.
How This Corner Bead Installs in a Render or EWI System
The manufacturer specifies a continuous strip of basecoat at least 100 mm wide buttered down each face of the corner before the bead is offered up. Press the PVC arris square to the corner, then work outward with the smooth edge of the trowel so the basecoat squeezes through every mesh perforation and fully encapsulates both wings. Check verticality with a long spirit level at every metre — the uPVC will spring to whatever line it is set at, and any wave allowed at the embed stage telegraphs straight through to the finish coat.
- Step 1 — Butter the corner. Apply a continuous 100 mm-wide basecoat strip down each face of the arris.
- Step 2 — Embed the bead. Press the PVC nose to the corner so basecoat squeezes through the mesh perforations.
- Step 3 — Trowel the wings flat. Smooth the basecoat over the wings; no mesh pattern visible at finish-coat stage.
- Step 4 — Lay field mesh under the wings. Tuck Ceresit CT325 160 g/m² fibreglass mesh under the bead wings while the basecoat is still wet.
- Step 5 — Reinforce any joint. Butt cut ends gap-free; bridge with a 250 × 250 mm mesh patch centred over the junction.
Trim with bead-cutting scissors rather than tin snips, which crush the PVC nose and deform the arris geometry. The full corner-bead sequence — including reveal detailing, joint reinforcement, and mesh layup order — is set out in our step-by-step corner bead installation guide for UK installers.
Pro Tips From UK Installers Using This Corner Bead
The most common failure at external corners is not a defective bead — it's a starved wing. The points below come from installers working across EWI retrofits and new-build elevations with Renders World stock.
- Continuous bed before the bead. Dabs of adhesive leave the wings sitting on the basecoat rather than inside it; the first significant thermal cycle prises them free.
- Work corners in shade on graphite EPS. Dark insulation surfaces accumulate heat fast, and a basecoat that skins before the wings are embedded will not bond the reinforcement.
- Match field-mesh weight to project exposure. Pair these 145 g/m² wings with 160 g/m² field mesh for genuine continuity across the corner-to-field overlap zone.
- Order one length per storey-height corner. Add 5–10% for cuts, joint patches, and the occasional damaged length lost in transit.
- Keep beads and field mesh on the same delivery. Chemically matching the corner and field reinforcement to one basecoat batch keeps the composite layer behaving as a single unit under thermal movement.
Is This Corner Bead Right for Your Project?
- Best for: external 90° vertical corners on EWI build-ups (EPS, graphite EPS, XPS, mineral wool, cement board) and direct thin-coat render on masonry corners.
- Sibling option — no-mesh confined angles: the 6 mm PVC corner bead without mesh suits internal angles, wet-plaster finishes, and locations where a 100 mm mesh wing cannot be embedded each side.
- Sibling option — heavy-impact zones: the aluminium 3.0 m corner profile offers significantly higher rigidity and impact resistance for plinths, ground-floor commercial facades, and high-traffic elevations.
- Sibling option — curved openings: the PVC arched corner bead with mesh is the correct selection for arched heads and curved reveals rather than forcing this rigid 88° profile around the geometry.
- Not for horizontal terminations: the manufacturer specifies against use on lintels, plinth bases, and any horizontal edge where water can track — plan bellcast or drip profiles for those positions and reference our guide to render detailing around windows and doors.
FAQ — Coverage, Compatibility, Application
How many corner beads do I need per corner?
One 2.5 m length covers a full storey-height corner with a small cut at the head. For 2.6 m storey heights, allow one bead per corner and trim 100 mm from the top. For taller elevations, butt two lengths gap-free and reinforce the joint with a 250 × 250 mm mesh patch; budget the extra patch pieces within the same field-mesh order and add 5–10% across the corner schedule for cuts and waste.
Can I use this bead on the plinth or at lintel level?
The Retek datasheet specifies against using mesh-wing corner beads on horizontal edges such as plinths and lintels where water can track. The profile provides no drainage path for horizontal flow, and moisture retained behind the wings in those positions can cause staining and freeze-thaw cycling. Bellcast or plinth-specific drip profiles are the correct selection for horizontal terminations.
Does the mesh wing replace the field reinforcement mesh?
It supplements rather than replaces it. The bead's 100 mm wings reinforce the immediate corner zone; the field reinforcement mesh tucks under those wings so the corner ties into the wider reinforced layer. Both elements must be present and encapsulated within the same basecoat application for the system to perform as a continuous composite reinforcement layer.
Will the PVC arris discolour under UV exposure after rendering?
Only the narrow PVC arris remains visible once the system is rendered, and the lead-free uPVC formulation is UV-stabilised for facade service life. The mesh wings sit fully buried in the basecoat where UV exposure is not a factor, so long-term colour stability at the visible arris is reliable under normal UK facade conditions.
What is the installation temperature range?
Install between +5 °C and +30 °C for both air and substrate temperature — the same conditions required by the basecoat. Avoid embedding beads under direct sunlight onto hot insulation surfaces, and protect freshly embedded corners from rain until the basecoat has reached full set, as specified in the Retek datasheet.
Technical Documentation — Corner PVC Bead with Mesh TDS