
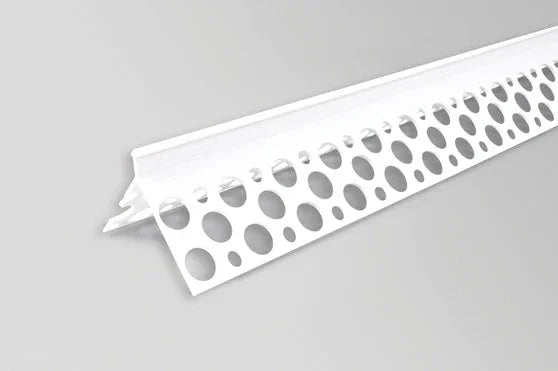

Description
A corner bead is bought on one measurement and judged on another. The nose depth is what the buyer selects; the finished arris is what the client sees, and the two only agree when the depth is measured at the wall rather than assumed from the system name.
Where a 10mm Nose Belongs on Traditional UK Render
Traditional wet render at a corner needs a bead whose nose matches the finished depth, and Renders World lists the 10mm PVC render corner bead no mesh at £3.10 per 2.5 m length, fetched September 2026. It is the middle depth of three no-mesh profiles in the PVC, aluminium and steel corner profile range, supplied as single lengths rather than packs.
The distinction that matters is how the profile anchors itself. A mesh-wing bead relies on a reinforced basecoat to bury its wings; a no-mesh profile has perforated arms that render squeezes through, so it keys mechanically into a thick coat and needs no separate reinforcement pass at the corner. That makes it a thick-coat profile by design rather than by economy.
- Sand-and-cement two-coat work: the arms bed into the scratch coat and disappear under the float coat.
- Monocouche and one-coat mineral finishes: a single application over a bedded bead, with no mesh layup to programme in.
- Lime and re-render elevations: where the build-up is deeper than a thin-coat system and the corner is formed wet.
Why Installers Specify the No-Mesh Angle at This Depth
The middle depth sells because it matches what most traditional UK render actually finishes at, once the scratch coat and the float coat are both accounted for. Specification at this level is arithmetic at the wall, not a preference between brands.
- Mid-range nose for thick-coat work: deeper than the shallow profile, shallower than the heavy-build one, which puts it in the middle of the range Renders World stocks.
- Mechanical key without a mesh layer: render locks through the arm perforations, so the corner does not depend on a fibreglass wing bonding into a basecoat.
- One-pass corner detailing: bed and over-render in the same operation, with no separate reinforcement stage at the arris.
- Rigid profile holds its set line: the bead keeps whatever line it is given over the full length, which rewards a long level at bedding and punishes a rushed one.
- Ten pence between depths: at £3.00, £3.10 and £3.30 across the three profiles in September 2026, ordering the correct depth rather than the nearest one in the van costs almost nothing.
Dimensions Confirmed, and the Figures This Page Withholds
No manufacturer datasheet exists for this profile in the Renders World document set, and a live search this session returned only competitor listings and generic catalogues. Nothing read this session gives an arm width, a render-depth band or a standard reference for the 10mm PVC render corner bead no mesh, so the table states what is known and marks the rest plainly.
| Property | What this session can state |
|---|---|
| Nose depth | 10 mm, from the product name |
| Length | 2.5 m per piece, from the product name |
| Material | PVC, from the product name |
| Supply | Single length, one variant, in stock at fetch |
| Price | £3.10 per 2.5 m length, September 2026 |
| Arm width | Not published — no datasheet read |
| Render depth band | Not published — no datasheet read |
| Internal angle | Not published — no datasheet read |
| Standard reference | Not published — no datasheet read |
| Application temperature | Not published — no datasheet read |
| Fire classification | Not published — no datasheet read |
| Despatch weight | Not published — figures conflict across the three depths |
The working instruction is short. Hold a straight edge across the corner, measure the depth the render will actually finish at including any dubbing out, and match the nose to that reading. On a profile costing a few pounds, a tape at three heights per storey settles the specification more reliably than a published band ever could.
Bedding and Over-Rendering a 10mm Corner
Back-buttering both arm faces before the bead goes near the wall fills the perforations more consistently than pressing render through from the substrate side. Load the arms, offer the profile up square, and check the fill along the length before moving on.
- Bed both arms continuously rather than in dabs, so no hollows sit behind the arms once the corner is over-rendered.
- Press the arris square until render extrudes through every perforation along both arms — visible extrusion is the check that the key has formed.
- Plumb the line with a long level while the bed is still open, since the rigid profile will hold a wave as faithfully as a straight line.
- Cut with a fine-tooth hacksaw or bead scissors; tin snips crush the nose and take the arris out of square at every joint.
- Butt cut ends tight and render across each joint continuously, so the finished arris reads as one line down the elevation.
Where mechanical fixings are added on exposed corners or low-suction substrates, they supplement a continuous render bed rather than replace it. Head and base terminations, and the order of work where corner, stop and bellcast profiles meet, are set out in the step-by-step corner bead installation guide.
Conditions on the Day That Decide the Arris
Fix and over-render in the same session wherever the programme allows. A bead bedded and left overnight moves with the temperature independently of mortar that has begun to set, and the corner performs best when bedding and surrounding render cure as one mass.
Dampen high-suction masonry such as aircrete before bedding, and use a bonding slurry on dense concrete or painted brick. The substrate decides how long the bedding mortar keeps its water, and that window is what the arms are relying on.
Where the corner forms part of a water-management detail or lands at an opening, the right profile changes with the location. The guide to render detailing at windows and doors works through each junction in turn.
The Three No-Mesh Depths Side by Side
All three profiles do one job — a flush arris keyed by perforated arms into a thick coat — so the decision is nose depth against measured finished depth. Renders World holds them as separate lines within thirty pence of each other.
| Profile | Nose | Price, September 2026 |
|---|---|---|
| 6 mm no-mesh corner bead | 6 mm | £3.00 per 2.5 m |
| This profile | 10 mm | £3.10 per 2.5 m |
| 15 mm no-mesh corner bead | 15 mm | £3.30 per 2.5 m |
Depth bands are deliberately absent, because no datasheet for this range was readable this session. Step up where a dubbing-out coat or a retained existing render will push the build-up deeper at the arris than the finish coat alone suggests, and step down where the corner is a confined reveal with no room for a deeper nose.
Ordering by Corner Length, Not by Storey Count
Take off by measured corner run and round up per corner, because part-lengths rarely transfer usefully between one corner and the next. A worked example: 22 m of external corner ÷ 2.5 m per length = 8.8, so nine lengths, and 9 × £3.10 = £27.90 at September 2026 pricing. Set the cutting allowance against the number of short returns on the job rather than a flat percentage.
- Traditional thick-coat elevations: this depth is the straight-through specification, bedded and over-rendered in one pass.
- Shallow or heavy build-ups: step to the shallower or deeper profile so the nose finishes flush rather than proud or buried.
- Reinforced-basecoat thin-coat systems: a no-mesh profile brings no wings, so field reinforcement carries round the corner separately — Ceresit's sheet for CT 325 reinforcing mesh sets strip overlaps at about 10 cm and adds diagonal patches of roughly 20 × 30 cm at window corners within Ceresit ETICS build-ups.
- Delivery: small parcels up to 25 kg travel on a next-day courier service, curbside, under a site-wide policy rather than a claim about this line.
Measure the corner depth, then order the matching count from this page.
FAQ — Depth Matching, Mesh and Ordering
How many lengths does a two-storey elevation take?
Measure each vertical corner run rather than assuming a storey height, divide by 2.5 m and round up corner by corner. Adding all the corners together and dividing once understates the order, because every corner finishes in an offcut that the next one cannot use.
Does the 10mm PVC render corner bead no mesh need separate corner mesh?
On traditional thick-coat and lime renders the perforated arms provide the key, and a separate corner mesh is not normally specified. Reinforced-basecoat systems are the exception: there the field reinforcement carries round the corner as its own layer, or a mesh-wing profile takes that role instead.
When should the deeper profile be ordered instead?
Once the finished coat at the arris will sit deeper than this nose, the deeper profile keeps the bead flush. Twenty pence separates the two lines, so the measurement at the wall decides it rather than the price.
Can this bead be fixed with nails alone?
A continuous bed of render or adhesive mortar remains the primary fixing, with nails as additional security on exposed corners. Fixing through the perforations without a bed leaves voids behind the arms that fill unevenly during over-rendering, and even bedding is what keeps the arris stable through the first thermal cycles.
Is a corner profile right at a plinth or sill return?
Horizontal terminations where water tracks across the face want a drip or bellcast profile that sheds it clear of the substrate. Profile selection by detail type is covered in the bead selection guide by render detail.