
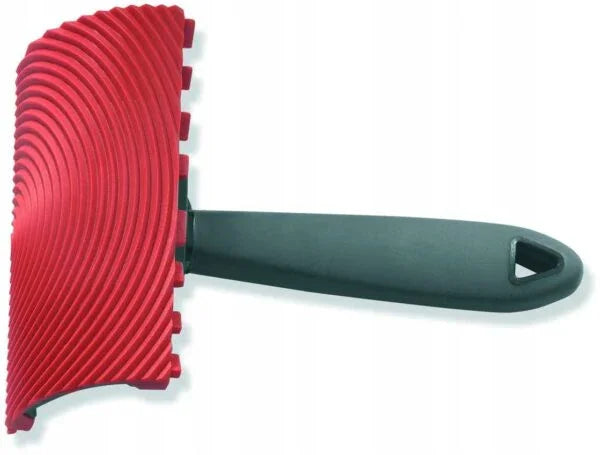

Description
A two-metre plank face cannot turn a window reveal. The Fox wood imitation stamp is the hand-sized tool that can, and at Renders World it sits in the timber effect render range beside the long format it works with.
What the Fox Wood Imitation Stamp Puts on a Wall
The maker of the Fox wood imitation stamp calls it a stamp for making an imitation of tree rings, and that is the whole description: rings of wood rather than a run of sawn boards. Fox Dekorator is a Polish wall-decoration brand and has been part of Grupa Atlas since 2013, which is why a Fox stamp and an Atlas render belong to one system rather than meeting by accident.
The material it presses is ATLAS CERMIT WN, a white cement and lime mortar laid at about 4 mm with a maximum aggregate of 1.0 mm. Three properties of that mortar decide what a hand stamp can do with it.
- The layer is thin, so the pattern has to be pressed while the surface is still soft — 20 to 60 minutes after laying.
- Cellulosic fibre reinforcement stops a 4 mm coat breaking as the ring pattern goes in.
- Sections are joined wet on wet, so detail work happens in the same pass as the wall beside it, not the next morning.
Where a Hand Format Earns Its Place
Most wood-grain facades end up using both formats, so the question is not which stamp to buy but what each one is for. Four jobs belong to the hand tool.
- Detail areas on a stamped elevation. Window reveals, corners, soffits and narrow piers, worked in the same wet-on-wet pass so the junction does not show.
- Feature panels rather than whole walls. Porches, entrance bays and plinth sections, where a long face has nowhere to land.
- Sample panels. The maker asks for consumption to be confirmed by trial on the substrate actually being rendered, and the Fox wood imitation stamp is the practical way to run that panel.
- Repair is the fourth case: a damaged patch is cut back, refilled and re-pressed by hand, which is not work a two-metre face can do.
Fox Wood Imitation Stamp — What Each Figure Belongs To
The tool is a hand-sized elastomer stamp with one pattern. Every number that matters on this job belongs to the render it presses, so each figure is published with the document it comes from.
| Parameter | Figure | What it applies to |
|---|---|---|
| Tool | Stamp for an imitation of tree rings | Fox Dekorator, the maker's own listing |
| Render layer | About 4 mm; 3–4 mm in the system article | ATLAS CERMIT WN |
| Aggregate | Max. 1.0 mm | ATLAS CERMIT WN |
| Press window | 20–60 minutes after laying | ATLAS CERMIT WN, weather dependent |
| Render consumption | 2.5–3.0 kg/m² — a 25 kg bag covers about 8–10 m² | ATLAS CERMIT WN |
| Working temperature | +5 °C to +30 °C, substrate and air | ATLAS CERMIT WN and the release agent |
| Release agent | About 50 ml per greasing | ATLAS anti-adhesive for moulds |
| Time to colour | Hard after 24 hours, stain after three days | ATLAS CERMIT WN |
| Cleaning | Water with detergent, after every session | Render card and agent card alike |
How to Use the Stamp on Cermit WN
The tool only ever arrives at step five, so the sequence below follows the render's own order. The wider multi-product method belongs to the concrete effect render application guide.
- Prepare and prime. A reinforced ETICS layer built in ATLAS STOPTER K-50 needs no key coat after three days; the same layer in any other Atlas adhesive takes Cerplast from the exterior render primers range. Concrete waits 28 days at under 4% structural moisture.
- Mix. 0.21–0.24 litres of water per kg, or 5.25–6.0 litres per 25 kg bag. Stand five minutes, remix, then use within one hour.
- Lay at 4 mm. Smooth float, comb with a 10 mm notched trowel, smooth again.
- Watch for surface set. Twenty to sixty minutes, depending on the weather. This step decides how deep the wood rings from the Fox wood imitation stamp come out, which is why a trial panel earns its time.
- Grease, then press. Coat the face with the anti-adhesive agent for moulds before use, then press strongly and uniformly — a light press leaves the rings faint.
Both formats are compared side by side in the wood and brick stencil guide.
Sequencing Detail Work Around the Main Elevation
On a facade using both formats, the value of the hand tool is in the order of work rather than the technique.
- Wet on wet, always. Each smoothed section is joined before it dries, or the junction stays visible for the life of the wall.
- Put format changes on planned breaks. Corners, building returns and the line behind a downpipe are where a switch from plank to rings disappears.
- Protect the surface from direct sun, wind and rainfall while working and throughout drying — on detail areas the scaffold sheeting is usually already where it needs to be.
After 24 hours the render is hard, and after three days it takes an ATLAS BEJCA tinted impregnant in one of ten wood tones. Which tone suits which elevation is covered in the sealers for concrete effect renders guide.
Cleaning the Stamp After Every Session
- Wash it thoroughly with water and a detergent until no release-agent residue is left.
- Do not leave it until tomorrow. Incomplete washing risks permanent deformation, and a deformed face never gives a correct texture again.
- Clear the recesses during the work as well as at the end, so the tenth impression is as crisp as the first.
Two Formats, One Method
Renders World stocks two stamps for this finish. Both press the same mortar at the same moment, so the choice is reach and pattern.
| Your project | Format to order | Why |
|---|---|---|
| Reveals, columns, panels, sample boards | Fox wood imitation stamp | Hand-sized wood rings, reaches a reveal |
| Long unbroken elevations, repeat plots | Atlas silicone wood stamp | 0.40 m² face; fewer presses, fewer joints to find |
Order the Stamp With the Render It Works Into
A stamp on its own produces nothing. The wood-effect system has five parts in a fixed order — primer, render, stamp, release agent, impregnant — and Renders World stocks all five.
- Main elevations. Most jobs run the atlas silicone wood stamp on the open wall and keep the Fox wood imitation stamp for everything the long face cannot reach.
- Colour arrives last, three days after the render, in one of ten tones.
Order it with the render, the release agent and the impregnant from the wood-effect range, so the finish arrives together.
FAQ: Renders, Timing, Indoor Use and Care
Which render is the Fox wood imitation stamp used with?
Cermit WN. It is the render whose method specifies imprinting with a stamp, laid at roughly 4 mm with a maximum 1.0 mm aggregate, and it is the only one in this range that names the procedure. Tell us the effect you are after and we will confirm the pairing before you order.
Can the finish go on an interior wall?
Not with Cermit WN. Its card routes internal walls and plasterboard to a different Atlas render and ceiling soffits to another again; neither is stocked here. The ring-pattern method itself is written for the external mineral render.
How much render does a stamped panel need?
At 2.5–3.0 kg/m², a 12 m² feature panel needs 30–36 kg, so two 25 kg bags with the trial panel allowed for. The maker asks for the exact figure to be established by trial on the substrate you are actually rendering, which is one more argument for that panel.
How long after laying should I press?
Between 20 and 60 minutes, once the material has stiffened and dried slightly at the surface. Warm breezy conditions shorten it; cool still air extends it. Mixed mortar stays workable for one hour, so panel sizes are planned around both figures.
How should the stamp be cleaned and stored?
The Fox wood imitation stamp needs three things, every session:
- wash with water and a detergent until no residue is left;
- clear the wood-ring recesses as you work, not only at the end;
- store it flat, because the warning that matters here is about deformation.