


Description
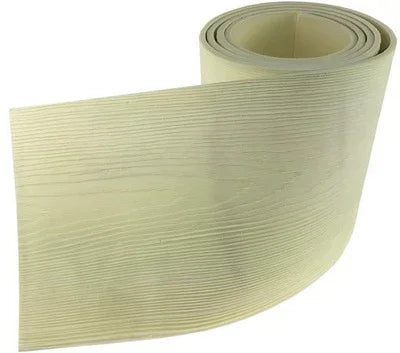
Timber grain on a facade is pressed, not painted. The Atlas Silicone Wood Stamp 200x20cm is the silicone tool that does the pressing, and at Renders World it sits in the wood effect render range beside the mineral render it was designed around.
What the Atlas Silicone Wood Stamp 200x20cm Presses Into
The silicone stamp works on one material: ATLAS CERMIT WN, a white cement and lime mortar with dolomite aggregate, quartz powders and a water repellent. Three things in that recipe exist because a silicone template has to go into it.
- The aggregate is finer than in the maker's other mortars, at a maximum of 1.0 mm.
- Cellulosic fibre reinforcement keeps a thin coat from breaking as the grain goes in.
- Water absorption class Wc1 and vapour category V2 keep the pressed surface behaving as a facade should.
Thickness is where the format earns its place. The technical card gives the layer as about 4 mm; the system article gives 3–4 mm. Either way the wall carries real material, and the 2 m silicone face of the Atlas Silicone Wood Stamp 200x20cm takes a continuous line of grain across it instead of a run of short presses.
Where the Long Format Pays for Itself
Four situations on UK work suit a 2 m face.
- Whole elevations inside an insulation system. Cermit WN is declared for ETICS build-ups in EPS and mineral wool, so the plank finish belongs on the insulated wall, not on a feature panel only.
- Solid-wall renovation. Concrete backgrounds qualify after 28 days at under 4% structural moisture, and new cement or cement-lime plasters after seven days at 4%.
- Shaded and green-belt sites qualify too — every location category on the card is marked suitable, and the pH of 12 is the reason.
- Repeat house types are the fourth case: one pattern pressed the same way on plot after plot reads as one scheme rather than as a set of near-misses.
Atlas is blunt about the trade-off, and so is Renders World: this is multi-stage work. Lay, imprint, impregnate. What it does not need is a certificate — the maker states that application requires no professional training.
Atlas Silicone Wood Stamp 200x20cm — Data, and What Each Figure Belongs To
The silicone stamp itself is a simple object. Most of the numbers that decide the finish belong to the render underneath it, so every figure is published with the document it comes from.
| Parameter | Figure | What it applies to |
|---|---|---|
| Stamp dimensions | 2 m × 0.2 m | Stated on the Cermit WN card and in the Atlas system article |
| Stamp face area | 2.00 × 0.20 = 0.40 m² | Arithmetic; gross face, before impressions butt |
| Material | Silicone, suitable for multiple use | Atlas system article |
| Product | Atlas Silicone Wood Stamp 200x20cm | One silicone tool, one pattern |
| Pattern | One wood pattern, described by Atlas as unique | Atlas system article |
| Render layer | About 4 mm (technical card); 3–4 mm (system article) | ATLAS CERMIT WN |
| Aggregate | Max. 1.0 mm | ATLAS CERMIT WN |
| Render consumption | 2.5–3.0 kg/m² — a 25 kg bag covers about 8–10 m² | ATLAS CERMIT WN |
| Working temperature | +5 °C to +30 °C, substrate and air | ATLAS CERMIT WN and the release agent |
| Release agent | About 50 ml per greasing | ATLAS anti-adhesive for moulds |
| Cleaning | Water with detergent, after every session | Both the render card and the agent card |
| Reaction to fire | Class A1, the highest class | ATLAS CERMIT WN, DoP 108/1/CPR to EN 998-1:2016 |
How to Lay the Render and Press the Grain
Everything the silicone face does depends on the state of the render when it arrives, so this sequence follows the maker's own order. The wider multi-product method belongs to the concrete effect render application guide.
- Prime to suit the substrate. A reinforced ETICS layer built in ATLAS STOPTER K-50 needs no key coat after three days; the same layer in any other Atlas adhesive takes Cerplast from the exterior render primers range.
- Mix at the stated ratio. 0.21–0.24 litres of water per kg, or 5.25–6.0 litres per 25 kg bag. Stand five minutes, remix, then use within one hour, re-stirring rather than adding water.
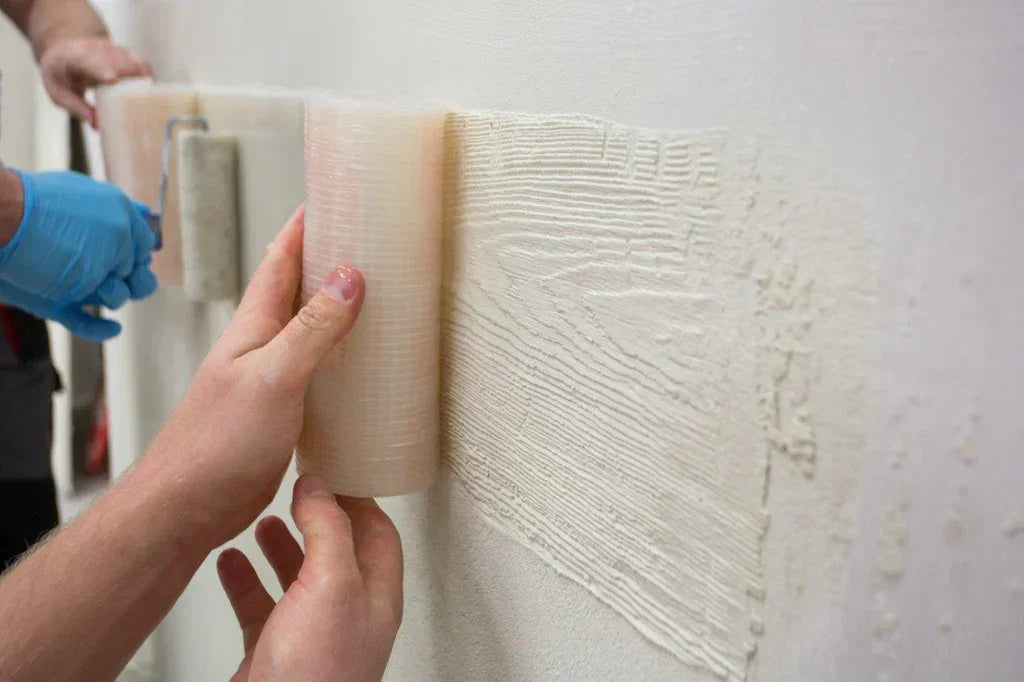
- Lay and comb. Apply evenly with a smooth float, comb through with a 10 mm notched trowel, then smooth again.
- Wait for surface set. The pattern goes in 20 to 60 minutes after laying, once the surface has stiffened and dried slightly. Warm breezy weather shortens that window; cool still air lengthens it.
- Grease, then press. Coat the silicone face thoroughly with the anti-adhesive agent for moulds before use, then press strongly and uniformly, or the rings will not show.
Technique for both formats, side by side, is set out in the wood and brick stencil guide.
Conditions That Decide Whether the Grain Comes Out Sharp
- Temperature band. Substrate and air both between +5 °C and +30 °C — the same band the release agent is rated for.
- Shelter. Protect the surface from direct sun, wind and rainfall during application and throughout drying. On this finish, scaffold sheeting is a specification item.
- Plan the stopping points first: corners, returns and the line behind a downpipe are where a wet-on-wet joint disappears.
After 24 hours the render is hard. After three days it can take an ATLAS BEJCA tinted impregnant, which is the step that puts colour into the grain; Atlas offers ten wood tones and the choice is covered in the sealers for concrete effect renders guide.
Greasing and Washing Between Impressions
- Grease the silicone before use, every time. The technical card gives that instruction with no impression count attached, and it is the stricter of the two documents on this point.
- Clear the recesses as you go. Render left sitting in the silicone grain detail keeps the next impression from landing as sharply as the first.
- Wash with water and a detergent after every session until no residue remains. Skipping it can deform the silicone permanently, so five minutes at the end of the day is what keeps the tool usable on the next job.
Two Formats, One Method
Renders World stocks two silicone stamps for this finish. Both press the same mortar at the same moment, so the choice is format and pattern rather than compatibility.
| Your project | Format to order | Why |
|---|---|---|
| Long unbroken elevations, repeat plots | Atlas Silicone Wood Stamp 200x20cm | 0.40 m² face; fewer presses, fewer joints to find |
| Reveals, columns, plinths, sample panels | Fox wood imitation stamp | Hand-sized, tree-ring pattern, reaches a reveal |
Order the Stamp With the Rest of the System
The Atlas Silicone Wood Stamp 200x20cm on its own produces nothing. Atlas names five parts in a fixed order — primer, render, stamp, release agent, impregnant — and Renders World stocks all five.
- Detail areas. The 2 m silicone face will not turn a reveal, so most facades run the hand format alongside the Atlas Silicone Wood Stamp 200x20cm and change tool at a design break.
- Colour and protection arrive last, three days after the render, in one of ten tones.
Order it with the render, the release agent and the impregnant from the timber-effect range, so the finish lands on site as one delivery.
FAQ: Coverage, Compatibility, Timing and Care
How many impressions does a 40 m² elevation take?
Working from the face of the Atlas Silicone Wood Stamp 200x20cm: 40 m² ÷ 0.40 m² = 100 presses as the arithmetic minimum. Impressions butt against each other rather than tiling perfectly, so allow above that. Render quantity is a separate sum — at 2.5–3.0 kg/m², 40 m² needs 100–120 kg, which is four to five 25 kg bags.
Can the finish go on an interior wall?
Not with Cermit WN. Its card routes internal walls and plasterboard to a different Atlas render, and ceiling soffits to another again; neither is stocked here. Send us the specification and we will tell you what fits.
What is the window between laying the render and pressing the Atlas Silicone Wood Stamp 200x20cm?
Twenty to sixty minutes, until the surface has stiffened and dried slightly. Mixed mortar stays workable for one hour, so panel sizes are planned around both figures.
Does the finished facade carry a fire classification?
The render is declared class A1 for reaction to fire under EN 998-1:2016 in Declaration of Performance 108/1/CPR, and that covers the rendering mortar. A tinted impregnant over it is a separate organic coating outside that scope, so the classification of a finished stamped wall is a build-up question, not a product one.
What maintenance does a stamped facade need?
None in the sense a timber cladding needs it. The finished surface is described by its maker as:
- hydrophobic and therefore dirt-resistant;
- stable under temperature change and air humidity;
- cleanable with water under slight pressure.
Protection and colour both come from the impregnant, and which tone to use is a question the sealers guide owns.
Technical Documentation
- Atlas: render imitating wood — the system and the stamp — dimensions, material, imprint force and the order of the five parts.
- ATLAS CERMIT WN technical card and Declaration of Performance 108/1/CPR — mixing, consumption, thickness, timings and classifications.