A successful external wall insulation project relies on six distinct layers working together to keep a property warm and weatherproof. Whether you are a professional installer refining your technique or a homeowner planning a renovation, understanding this build-up sequence is the difference between a facade that lasts 30 years and a callback within 12 months. This Renders World guide breaks down the external wall insulation layers UK professionals rely on, explains the critical tolerances that separate compliant work from defective work, and shows you exactly what each external wall insulation system component does — and why it matters.
Why Understanding the Full EWI Build-Up Matters
An EWI system is not a single product — it is a carefully layered assembly where each component relies on the one beneath it to keep the building warm, dry, and crack-free for decades. The adhesive must bond to the substrate; the insulation board must sit flat against the adhesive bed; the basecoat must encapsulate the reinforcing mesh at the correct depth; and the decorative render must key into a properly cured basecoat. If any single interface fails, the defect propagates outward. BBA-certified EWI systems are tested as complete assemblies precisely because isolating one component from the rest invalidates the performance warranty.
In the UK market, the push toward Part L 2021 U-value targets of 0.18 W/m²K for retrofit and the forthcoming Future Homes Standard 2026 has made correct build-up specification more critical than ever. Thicker insulation boards demand longer mechanical fixings, heavier basecoat coverage, and more attention to flatness tolerances. Renders World specifies system kits with these UK-tested thicknesses pre-matched so installers can diagnose site problems faster, reduce material waste, and deliver a facade that passes both Building Control inspection and the client's expectations for a clean, crack-free finish. The full U-value calculation method walks through how board thickness converts to compliant wall U-value for any substrate.
The sequence below outlines the most common UK setup for solid brick or block walls — an adhesive-and-mechanically-fixed insulation system with a thin-coat render finish. If you are a homeowner, this guide shows you exactly what to expect when your contractor arrives on site. Timber-frame and steel-frame substrates require additional detailing, particularly around vapour control and carrier board specification, but the core layer logic remains the same. Grasping how EWI render system works UK at this fundamental level equips installers, specifiers, and property owners to make confident decisions about materials and sequencing.
The Six Layers of an External Wall Insulation System
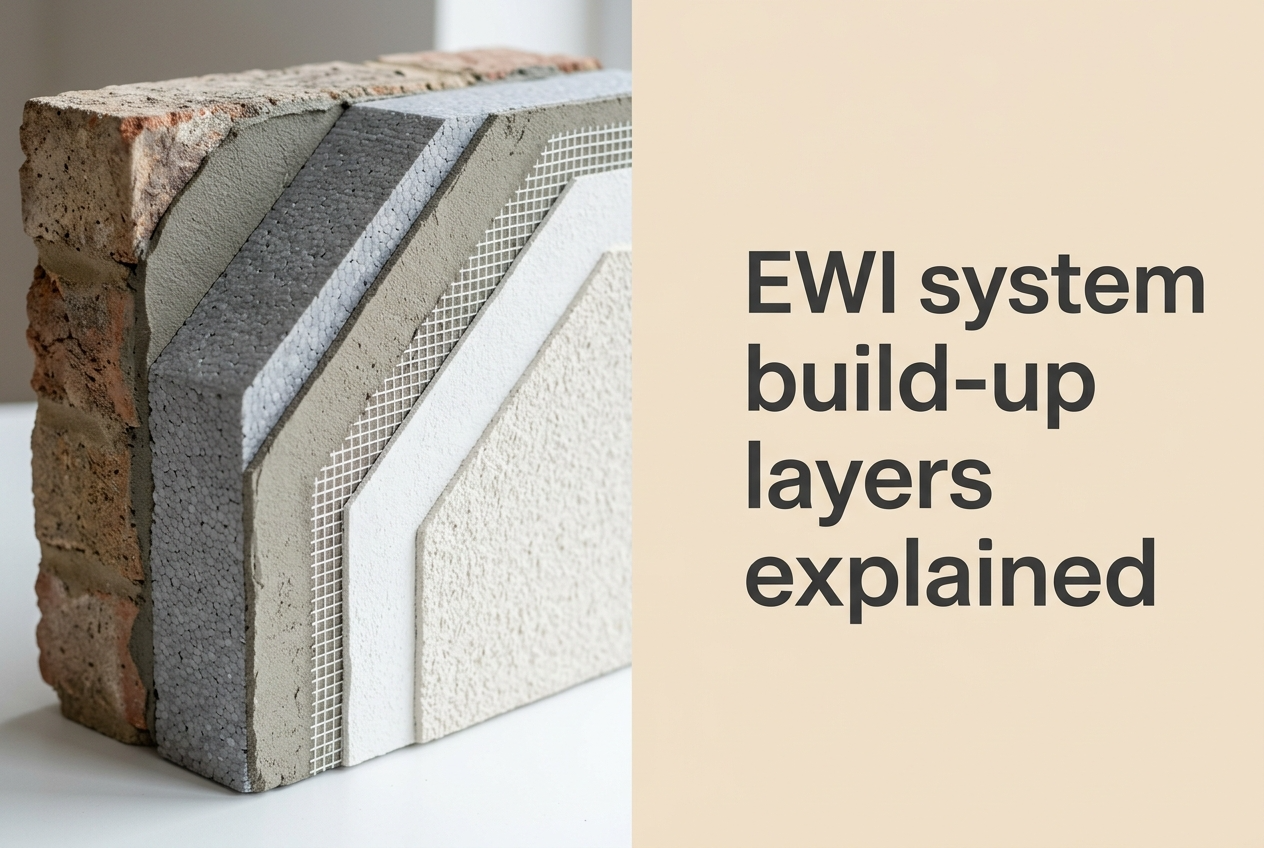
A standard thin-coat EWI system comprises six functional layers, each serving a distinct role in thermal performance, structural stability, weather resistance, or aesthetic finish. The table below summarises each layer, its typical thickness, and the key specification parameter that installers must verify on site before proceeding to the next stage. This overview covers the core EWI system components step by step UK professionals follow on every compliant installation.
| Layer | Function | Typical Thickness | Key Specification Check |
|---|---|---|---|
| 1. Adhesive | Bonds insulation to substrate | 10–15 mm | ≥40 % surface contact (full-bed preferred) |
| 2. Insulation Board | Thermal resistance | 50–200 mm | λ value, board flatness ±3 mm |
| 3. Mechanical Fixings | Wind-load and dead-load restraint | Flush to board face | Minimum 6 per m², embedment ≥25 mm |
| 4. Basecoat + Mesh | Crack resistance, impact strength | 4–6 mm total | Mesh at outer third; ≥100 mm overlap |
| 5. Primer | Adhesion promotion, suction equalisation | <1 mm | Correct primer type for finish coat |
| 6. Decorative Render | Weather protection, aesthetics | 1.5–2.0 mm | Grain size, application temperature ≥5 °C |
Each layer must cure adequately before the next is applied. Rushing the sequence — particularly between the basecoat and primer stages — is the single most common cause of render delamination on UK sites. A fully cured basecoat should present a uniform colour with no dark damp patches before primer application, which typically requires 48–72 hours in spring or autumn conditions and longer during winter months.
The total system thickness for a typical UK retrofit — 100 mm graphite EPS with thin-coat silicone render — sits between 116 mm and 125 mm from substrate face to finished surface. This dimension is critical for window reveal detailing, sill extension sizing, and base track selection, all of which must be confirmed before insulation boards arrive on site.
Step-by-Step Build-Up Sequence
The following sequence reflects current best practice for adhesive-and-mechanically-fixed EWI systems on masonry substrates in the UK. Each step assumes the previous layer has been inspected and approved. Skipping an inspection checkpoint — particularly the flatness check after board fixing — creates defects that are expensive to remediate once the basecoat is applied.
Layer 1 — Substrate Preparation and Base Track Installation
Clean the masonry face to remove loose material, organic growth, and any coatings with poor adhesion. Install the aluminium base track at the system's starting level, typically 150 mm above finished ground level, using a minimum of three fixings per 2.5 m length. The base track width must match the insulation thickness exactly — a 100 mm board requires a 103 mm track to accommodate adhesive tolerance.
Layer 2 — Adhesive Application and Insulation Board Fixing
Apply adhesive to the insulation board using the perimeter-and-dab method (minimum 40 % contact) or, preferably, a full-bed notched-trowel application that achieves 80–100 % contact and eliminates air voids behind the board. Press insulation boards into the adhesive bed working from the base track upward in a stretcher bond pattern, staggering vertical joints by at least 150 mm. Check flatness across every four-board span with a 2 m straight edge — deviation must not exceed 3 mm.
Layer 3 — Mechanical Fixing Installation
Once the adhesive has cured (typically 24–48 hours), install mechanical fixings through the insulation board into the substrate at a minimum density of 6 fixings per m², increasing to 8–10 per m² at building corners and edges where wind suction loads are highest. The fixing length must provide a minimum 25 mm embedment into solid masonry after accounting for insulation thickness, adhesive bed, and any existing render or plaster. Countersink each fixing head flush with the board face and cap with an EPS plug to eliminate point thermal bridges. For the full fixing layout across corners, edges, and field zones, the insulation board fixing pattern and spacing guide sets out the exact density per wind-zone band.
Layer 4 — Basecoat and Mesh Reinforcing Layer
Apply the first pass of basecoat adhesive directly to the insulation face at approximately 2–3 mm thickness. Immediately embed fibreglass reinforcing mesh at 150 g/m² into the wet basecoat using a stainless-steel trowel, ensuring the mesh sits in the outer third of the basecoat layer — never directly against the insulation face. Overlap adjacent mesh sheets by a minimum of 100 mm. Apply a second pass of basecoat over the mesh to achieve a total reinforcing layer thickness of 4–6 mm. At window and door openings, install diagonal stress patches (approximately 300 × 200 mm) at each corner before the main mesh to prevent hairline cracking at these high-stress points.
Layer 5 — Primer Application
After a minimum 48-hour basecoat curing period (longer in cool or humid conditions), apply the system-matched primer by brush or roller to equalise suction and promote adhesion for the decorative render. A quartz-filled primer provides additional mechanical key for silicone and silicate-silicone finishes. One coat is standard; a second coat may be needed on highly absorbent or uneven basecoats.
Layer 6 — Decorative Render Application
Apply thin-coat silicone render to the primed surface using a stainless-steel trowel at a thickness matching the stated grain size — typically 1.5 mm or 2.0 mm. Work in continuous passes across each elevation to avoid visible lap marks. Texture the surface with a plastic float in a circular or straight-line motion within 10–15 minutes of application, depending on ambient temperature and humidity. Protect freshly applied render from direct sunlight, rain, and frost for a minimum of 24 hours.
The entire build-up sequence, from base track installation to render completion, typically takes 10–14 working days for a standard UK semi-detached property, with the majority of that time consumed by curing intervals rather than active application. Attempting to compress this timeline by applying layers before adequate cure is the root cause of most system failures identified in post-installation audits.
Trade Tips for a Defect-Free Build-Up
Obsessive Board Flatness Beats Costly Rework
Experienced EWI installers develop a set of site habits that prevent the most common build-up defects before they occur. The first and most impactful habit is checking board flatness obsessively — a 2 m straight edge should be the most-used tool on any insulation site, not the trowel. Boards that are not flat produce an uneven basecoat thickness, which in turn creates differential drying patterns visible through the decorative render as "ghosting" or "mapping." Rasping high spots and packing low spots with adhesive before the basecoat stage costs minutes; correcting the defect after rendering costs days.
Key Takeaway: Always install diagonal mesh stress patches at every window and door corner before applying the main mesh sheet — this single step eliminates the most common cracking defect on EWI facades and takes less than five minutes per opening.
Maximise Adhesive Contact to Eliminate Voids
Adhesive contact is the second critical variable. The perimeter-and-dab method, while permitted by most system certificates, leaves air pockets behind the board that can channel rainwater if a fixing seal is compromised. Full-bed adhesive application — using an 8–10 mm notched trowel — achieves near-complete contact, improves board alignment, and virtually eliminates the "hollow drumming" that auditors check for during PAS 2035 inspections. On uneven substrates where full-bed application is impractical, increasing the minimum contact from 40 % to 60 % by using larger dabs provides a meaningful improvement in both adhesion strength and thermal continuity.
Plan the Weather Window Before Starting Each Elevation
Weather management is where UK sites differ most from textbook guidance — always check the five-day forecast before starting a new elevation, and begin with the sheltered side of the building to buy drying time for exposed faces later in the programme. The adhesive, basecoat, and render layers all require application temperatures above 5 °C and must be protected from rain for at least 24 hours. In practice, this means that winter work between November and February requires either heated enclosures or a setting accelerator to shorten vulnerability windows and prevent costly re-work caused by our unpredictable climate. For a deeper look at how moisture moves through an EWI assembly during these vulnerability windows, the dew point and condensation risk analysis sets out where the condensation plane sits in a standard build-up.
Choosing the Right Components for Your Project
The performance of an EWI system is only as strong as the compatibility between its components. Mixing adhesive from one manufacturer with insulation boards from another and render from a third invalidates every BBA or ETA certificate in the chain. Professional installers working on NHBC-warranted new-build projects or PAS 2035-compliant retrofits must demonstrate that every layer belongs to a single tested system or, at minimum, that each component carries independent third-party certification confirming interoperability.
For UK projects targeting the Part L 2021 wall U-value of 0.18 W/m²K, graphite EPS boards with a declared λ of 0.031–0.032 W/mK at 100–150 mm thickness represent the most cost-effective solution for solid masonry walls. Mineral wool systems — with λ values of 0.036–0.038 W/mK — require greater thickness to achieve the same U-value but offer A1 fire-rated non-combustibility and superior vapour permeability, making them the mandatory choice for buildings above 18 m under the Building Safety Act. The basecoat adhesive must be matched to the insulation type: fibre-enhanced adhesives designed for EPS boards typically differ in formulation from those certified for mineral wool bonding. For a full side-by-side on these two insulation routes — including λ, fire rating, cost-per-m², and project-fit guidance — the graphite EPS versus mineral wool comparison is the practical reference UK specifiers come back to.
Agreeing on the full bill of materials before arriving on site prevents the installation delays and compatibility errors behind most UK project overruns — Renders World supplies complete, matched EWI systems rather than letting installers source components piecemeal from multiple suppliers. Every component choice made at the specification stage cascades through the rest of the build-up: thicker insulation boards require longer mechanical fixings, wider base tracks, deeper window sill extensions, and sometimes a recalculation of the fixing pattern density to account for increased wind-load leverage.
How to Specify Your EWI System — Final Build-Up Check
A correctly specified and installed EWI system transforms the thermal performance of any UK property, but the result depends entirely on understanding how six distinct layers work together as a unified assembly. From adhesive contact through to decorative render, each layer must be applied at the right thickness, in the right conditions, and with adequate curing time before the next stage begins. Whether you are specifying a commercial project or upgrading your own home, starting with a complete, BBA-certified system is the simplest way to guarantee that every layer works with the next. Browse the full Renders World external wall insulation range to match boards, adhesives, fixings, and render finishes to your project — one supplier, one delivery, full compatibility.
Written by Mariusz Saja. Technically reviewed by Rafał Wyrzykowski. Last reviewed Jun 2026.
Frequently Asked Questions
How many layers does an EWI system have?
A standard thin-coat external wall insulation system has six functional layers: adhesive, insulation board, mechanical fixings, basecoat with embedded reinforcing mesh, primer, and decorative render. Each layer serves a distinct structural, thermal, or aesthetic function, and the system is tested and certified as a complete assembly rather than as individual components. Omitting or incorrectly specifying any single layer compromises the performance and warranty of the entire facade.
How long does a full EWI build-up take to install?
A typical semi-detached UK property requires 10–14 working days from base track installation to final render application. The majority of this time is consumed by mandatory curing intervals — 24–48 hours for the adhesive, 48–72 hours for the basecoat, and 24 hours minimum for the primer — rather than by the application work itself. Rushing these curing times is the most common cause of cracked or failing render — if your contractor is delayed by weather, remember that waiting for the wall to dry properly is the best way to protect your investment, and most of the waiting time causes no disruption because the work is entirely external.
Can I mix components from different EWI manufacturers?
Mixing components from different manufacturers invalidates the system's BBA or ETA certification and removes the performance warranty. Each certified system has been tested as a complete assembly, and substituting one component — even if it appears equivalent — introduces untested interfaces that may fail under thermal cycling, moisture exposure, or mechanical load. If a project-specific constraint requires a component substitution, the installer must obtain written confirmation from the system holder that the proposed combination is covered by the certificate.
What is the minimum adhesive contact required for EWI boards?
Most BBA-certified systems specify a minimum of 40 % adhesive contact between the insulation board and the substrate when using the perimeter-and-dab method. However, professional best practice — and a growing number of PAS 2035 audit requirements — targets 60–100 % contact achieved through full-bed notched-trowel application. Higher contact percentages improve adhesion strength, eliminate air voids that can channel moisture, and produce a flatter board surface that reduces basecoat consumption and improves the visual quality of the finished render.